-->

Stack of Cushions

I'm so excited to share this update! Do you remember the vintage sofa I found at our local Salvation Army last month on my B-day no less? Do you remember I even even got in on sale, love that Thrift Stores have sales! Do you remember how ugly the fabric was? I know lots of questions, lol. If you do remember, then you know I was planning transforming the vintage sofa into outdoor sofa with the help of paint and new outdoor fabric. Of course we plan on storing the sofa in our garage during the cold / raining season, we wouldn't want to ruin all our of hard work. I'm here to share a portion of the updated vintage sofa! Right now Hasani and I are working on the re-doing the body of the sofa ( upholstering & painting ) and I wanted to share what has been completed! The cushions have been recovered & they look amazing. Here's a quick reminder of how the old cushions looked, decked out in old vintage fabric that was actually in perfect condition (just fugly) 


After looking ALL over the Internet for a good deal on indoor / outdoor fabric, I ordered two fabric samples from Warehouse Fabric both neutrals. We ended up loving the indoor outdoor fabric color Toast, its the perfect neutral backdrop for the array of colorful pillows I'm sewing for the vintage sofa and our outdoor dining furniture. I ended up buying 13 yards total of indoor fabric! Lemme tell you 13 yards is a lot of fabric!! I love when I order fabric and I receive it on a bolt, it makes cutting the fabric for sewing much easier. Anyways, I forgot to mention the insane deal I got on the fabric for, per yard I paid 6.98! That's an insane deal, because outdoor fabric is p-r-i-c-e-y. I love the texture of the fabric stiff but also soft, i prefer stiff fabric since we'll be using the sofa outdoors. The color is much light in person, the perfect soft beige, which you'll see in the pictures below. 


The vintage sofa has six cushions all together with piping and the thought of doing all that working left me feeling exhausted, I prefer sewing curtains and pillows. The last cushion I sewed for Avery's vintage ottoman was so much work and tiring, the flashbacks were stressing me out, so I decided to have a seamstress do the work for me. I'm really glad I made the choice to have that portion of the project done by someone else. These days with a little one crawling around and me just wanting to love on him, it was nice to hand-off the fabric and in return receive new cushions! In the past I've had really good luck finding vendors on Craigslist: our Wedding Photographer, Hair Stylist, Landscaper/Gardner to install our sprinklers in our front yard. So again I turned to Craigslist and found amazing seamstress, she's very talented which made me even more excited to have her sew the cushions for me. We agreed ed on a flat price for the sewing, I provided the fabrics three cushions & old covers to get the fit exact and zippers. Here are my new cushions, pretty perfect! I really like box cushions and I'm glad I decided to keep the look of the piping. For me piping adds a crisp look on cushions { my next sofa indoor one, most likely will have piping :) }


I also love how she did the zippers, they wrap nicely around the cushions making it super simple to take the cushions on and off. I bought three 30 inch zippers for the top cushions and three 36 inch zippers for the bottom. I just measured the old zippers to get the right size. 


I'll do a complete cost breakdown on re-doing the vintage sofa once its done! We plan on finishing up the sofa this week and then I'll be able to share next week? I'm hoping! :) 


What do you think so far?? Can you see my vision coming together? 


Photobucket

Grassy Update

Back in mid April, I shared that we over seeded our backyard in a couple of steps in hopes of having pretty green grass and less weeds for Summer. A quick reminder of the steps we took: 

  1. Raked up all the thatch on our yard & pulled larger weeds
  2. Hasani used a power Aerator to loosed up our soil 
  3. Hasani used a large lawn spreader to apply the seed evenly to our yard
  4. Next we used 1 bale of weed free to hay and spread it over our lawn to help the grass grow and keep moisture in.
  5. Lastly we watered watered and watered our seeds and grass like crazy

Before I show you the current state of our backyard, here's a reminder of how it looked right after we Aerated our lawn. Yup, very dry and patchy weedy grass and lots and lots of overgrown bushes.


Mid April 


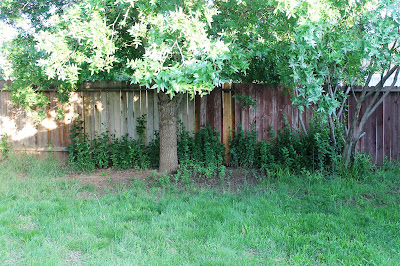
Here's the current state of our backyard. Much better! Look at all the green grass! I'm very happy, the ratio of weeds to grass is so much better. I'd say 75% grass and 25% weeds much better that our previous ratio of 90% weeds and 10% grass. Gone are all the huge weeds, were left we smaller patches of weeds and as of right now I'm OK with that. We have one area closest to our patio that's a little dry, that maybe how the sprinkler is hitting that area and its not getting enough water. Here's our grass progress, big difference over last month huh.  


Mid May Progress


We still want more green grass, to mimic our pretty sod in our front yard. I'm thinking we will mostly likely to another round of re-seeding our lawn in September just before fall. Since are Summers are so HOT in Northern California 100+ it will be best to wait. 

Mid April


Mid May Progress


In the meantime there is still more more work to be done! We will need to weed and feed our backyard if its not already to late before Summer really hits. This week and over the weekend we have a lot of bush pulling up that needs to be done. See the row of bushes forming along our fence line, yeah we have no idea where they came from they just appeared and started growing. 


Mid May Progress


After those funky bushes are pulled up we plan on laying down weed blocker and covering the area up a lot of the area underneath the trees up with mulch. We are hoping it gives a more clean semi landscaped appearance. I also want to cut done that funky dead looking pine tree 9not sure when that will happen) I seriously hate that thing, its all wrong + I hate pine needles. Oh and we need to trim back lots of the bushes and trees that are becoming overgrown and Hasani needs to edge our grass (get those tight spots the lawn mower can't reach)


I also to need to re-paint our old terra cotta pots (that have been hanging on the tree house way to long) and add some pretty flowers and move them onto our patio. Avery's first birthday party is in a few weeks, so I have just enough time to add some more pretty to our backyard. Parties = motivation to get stuff done!

What you think of our progress? Are you working on any grassy updates? Or are you prettying up your backyard too?


We welcome all lawn care tips, to keep our grass bright and green over the Summer and though the Fall/winter!! :)


Photobucket

Counter Samples

Its finally happening after living with our current counter tops for more days than I care to think of ( well over a thousands days) we are finally giving them the heave-ho and having new counter tops installed!! Yep, that sentence required two exclamation points :) I'm beyond thrilled, picture me with a sledgehammer dancing around my kitchen ready to start demo, lol 


We want to get our counter-tops replaced in June, which is right around the corner! Right now were not to far into the process regarding who's going to install them. Here's what I do know: DIY the counter demo, install new counters, DIY white subway tile, installing a stainless steal kitchen sink, replacing our facet and getting a new garbage disposal. Replacing our counter tops has been on my mind for quite sometime, in fact a six months after moving into our home went to a few local tile shops and got some samples. The timing wasn't right ( we were planning our wedding and doing lots of DIY projects around the house and then we got pregnant and demo and my pregnancy didn't mix) Now I feel the timing is finally right and want to get started on this project asap. 


I want our kitchen to feel clean and fresh, right now the area is very very dark. Our current cabinets are dark brown, and the current counters are white with dark brown thick grout (yuck!) and our floors are dark brown (faux wood floors) even with our good sized kitchen window, the area is dark. Our plan is to lighten everything up, and say bye bye to its current gloomy state. We have decided not to spend the extra money on Granite or Quartz both our nice but, way more than we care to spend on our small kitchen. My personal goal is to spend less than 1k on new counters. With that budget in mind, solid surface is our best option. Here's a look at the counter top selections, the lighter natural counter samples with decided to to nix, we picked those ones long ago when we were first thinking of replacing our counters.  


Samples left to right skipping the ones mentioned above: Corian Night Sky, Corian Rain Cloud, Corain Glacier White 


Option # 1
I really like the look of Corian Rain Cloud with the white subway tile, the tile really picks up the softer white tones in the Rain Cloud sample. The tones are more noticeable in person. Corian Rain Cloud is so pretty I love the subtle grey veining. 

Option # 2
This is how the white subway tile looks with with the Glacier white Corian. The glacier white is pretty and so much whiter than the softer white subway tile. 

Option # 3
Another option that I've always liked is going with dark almost black counters and white subway tile. The look is classic and clean. The black Corian reminds me of satin finish granite. 

Not An Option
Lastly, this is my dream 'A girl can dream category', gorgeous marble slab of pretty with subway tile!! I love the look, but it would blow my budget away lol, but I still had to share!! :)


After going back with and forth with the options. I really think I prefer the white on white look of Option # 1 & 2. I really love the look of pretty much white counters with white cabinets and eventually stainless steal appliances. 

On Sunday evening we stooped on Lowes to get the pricing on the samples we liked, because in the end it all boils down to square footage we have roughly 25sq + feet of counters that need to be replaced. I'm also not sure how they take into account sinks and free standing stoves into the overall counter measurements. I'll know more when we have them professionally measured soon. Here's the price per feet breakdown at our local Lowes in Sacramento: Option # 1 falls into the E category at $72 a square foot total $ 1800.00 for kitchen budget blown!  Option # 2 falls into the A category at $ 39 a square foot total $ 975.00. Both of my totals don't include pricing on sink cutouts and holes for facets. I'll know more about the extras when I speak to a CSR at Lowes. While we where at Lowes, I noticed LG HI-MACS also has a solid white counter option. I need to see how the counters compare against Corian, but I'm liking the pricing, two dollars less per square foot can add up.  


I also snapped at picture of Allen + Roth pricing - the white counters I like are $ 33.00 a square foot. I need  to do some research on the warranty, but the total would be $ 825.00. 


Now back to the backslash, I've love the look of white subway tile for eons. I LOVE it, the look is timeless, pretty and clean. So if we go with Option # 2 white counters and white subway tile, white cabinets, I think we can pull the look out with out our kitchen feeling sterile. Here's some white kitchens I love.


I love the white counters (OK they are marble, but from a distance they look pure white) look pretty with the white cabinets and white backsplash. I'm also a fan of glass doors on cabinets, we got the middle sections of our cabinets cut a while back, next we'll be adding glass once the doors are painted.


{via Pinterest}


This kitchen is almost perfect example of the look I want (but on a much much larger scale!)


{ via Pinterest}


If we stay on budget with the other items we need to make our counter makeover complete (new sink, new facet and new garbage disposal) I would love to have marble subway tile for the backsplash. That would be PRETTY! 


{ via Decorpad }


I plan to make a lot of headway on our counter project this weekend, I will be stopping into a local kitchen showroom and getting prices vs. going with Lowes. Right now I'm leaning towards Lowes because we can use our Lowes card and save 5% on our counters, of course we'll make a payment right away and pay the credit card off.   


What do you think our countertop selections? If you had your counters replaced did you go with the Big box store or keep it local? Do you know if the included free standing stoves in the square footage when measuring for solid surface counters??  


Photobucket

Cupcakes

Sadly I won't be sharing any cupcakes I made recently with you all today, instead I'm sharing my new Martha Stewart's Cupcake book I recently bought from Amazon. I've owned (in person) the book for less than 24hrs and I'm already in love! 


I bought the book because, I really needed cupcake guidance from start to finish: what flour to using, to how to make pretty piping and beyond. Why? Well because I plan on baking cupcakes for Avery's 1st Birthday party plus his own mini smash cake. Whenever I use one of Martha's recipes whatever I'm baking or cooking always comes out pretty, and yes some of her recipes are labor intensive requiring many steps. But I get it, because the in the end all those steps result  in delicious food to share with you r loved ones. So for the next few days, I'll be tagging recipes to 'taste test' I'm sure my family will be happy!


Buy in good cookbooks lately? 

Photobucket

Small Exterior Upgrade

We've done many exterior upgrades since moving into our little Rancher three years ago: painted our entire house, installed sod, painted of front door, upgraded our flower beds and more. Not long after we painted our house, we changed out the old dated light fixture (that's next our front door) into a chic black one. Total we have three exterior lights, and only upgraded one of them, shame on us! So on a recent trip to Home Depot, I stopped in the lighting department, which I almost always do and decided to was time we upgraded our fugly crooked motion sensor light fixture that rest outside our garage door that leads to our backyard. Here's our old light fixture, yikes right! I detest our ugly it is, its dusty and icky white outdoor lights in my book aren't a good thing.


 I decided to go cheap thrifty on this upgrade because its a sidelight, not seen from the street and matching it with our front door light fixture would have set us back 30 bucks, for this project um no. I found the perfect simple light fixture, a black matte jelly light fixture for only $ 6 bucks! We really like how black accents look on our grey house (black shutters, mail box, and hanging pots) Here's how new light fixture, sweet and simple! I love how it looks, we need to do a little touch-up paint around the light fixture our old yucky house color is showing. I'll tackle that 5 min project this week. 


I never thought a I'd love a simple jelly light fixture so much! lol


Next we plan on upgrading our Exterior garage light fixtures, and removing the over fuglly motion sensor light fixture. The one at least looks in better condition than the one we just replaced! We also plan on going from one garage light fixture to two. We like this light fixutre that compliments our front door light. Hopefully we'll tackle the light small exterior upgrade sometime this month. 


What do you think our simple exterior upgrade, much better huh? 


Photobucket

Spice Girl

First, sorry for my lack of posts last week. I had one of those weeks, where I got a lot done and never had a chance to blog about what's been going on {I even took off Friday from my day job
}  I had such a nice Friday being a mommy going for a pretty walk along the river and doing a little shopping. I'm glad to be back to share what's going on, I missed blogging. I really feel its my creative outlet and really helps my thought process and its my way to maintain my voice in my sometimes crazy busy life of being a mom to a tween and a baby about to turn one and wife to a husband I adore. I know you can all relate :) Life is busy, but fun! And now for my spicy post, lol. 


I'm a wanna be spice girl, no not the late 1990's Spice Girl kind, the all my spices are in pretty jars kind of Spice Girl. This post is sadly 7 months in the making, wow I admitting it took me 7 months to complete this simple upgrade I'm about to share. So lets go back in time seven months ago, I was getting fed-up with our spices. Everything was in mismatched spice containers and I could never find the spice I was looking for so most of the time I would buy another container. Because of that, I had three spice containers of cumin powder! which just means we were being careless and wasting money. I really wanted all of our spices jars the same, its just more pleasing to the  eye the spice jar then spice jar chaos. 


I mentioned to my friend Summer, I was in desperate need of a spice jar makeover and I wasn't loving the spice jars at Ikea. She suggested I check out the spice jars at World Market. I pulled out all my spice jars and did a count, I made sure to exclude the duplicates. Next I popped on their website, I liked the styles are the prices too! 


Before I left my house, I pretty sure I was going to buy the boxed set of four spice jars for $ 3.99.  I like the simple style of the upright ones. 


However, when I got there I decided on a different style of jars and the price was good too, only 99cents a jar! I loved them. I needed 20 jars and was only able to buy 12 at that store (I cleaned the store out!) So on my way to another Cost Plus Store where I bought the remaining 8 jars I needed. I planned on to starting my spice makeover (pun intended, lol) asap, but got delayed. So the jars I bought which I'll share in minute, sat in tow bags wrapped carefully untouched for seven months. Sad I know, but that's' life sometimes you get sidetracked a little or in my case a lot, lol. Remember when I mentioned I did a little shopping on Friday? Well I've been meaning to pop into Sur La Table forever and since Hasani had the day off and wanted to check out their BBQ stuff (they have great grill stuff) off we went. 


We spend a long time in the store looking around, I made friends with the sales person and he showed me their huge clearance section tucked in the back of the store. There I spotted the cutesiest ceramic salt  containers. I was stunned buy the awesome price of $1.99! They only had blue and purple left, I grabbed a blue one. They have them online for $ 3.99 on clearance the regular price is $ 9.99, you can check them out here


The Salt Jar Reads ' Terracotta from Tuscany Salt ' 


Back when I bought my spice jars, I also bought these little white ceramic jars for our salt. I love that I know have three separate salt containers, one for table salt, sea salt and kosher salt. 


So after our trip to Sur La Table, I decided that night I found finally give my mismatched spice containers a makeover. I used a funnel to transfer the spices into the jar. It made the process so much smoother and almost mess free. 


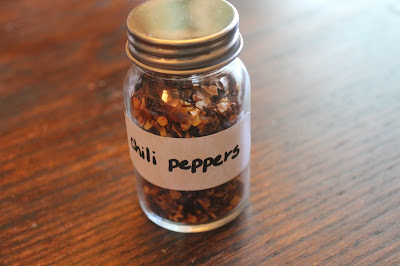
Here's a better view of the spice jars I bought. Simple glass jars with a twist on metal top, they come with a removable insert. For now I used simple white mailing labels and and wrote all the spice labels. In the future I want to use a heat transfer on glass and do more text. Kind of like these cute jars, I pinned a 'How To' a while back here. For now I like how they look!


I love that i can now keep my sesame seeds in a jar!


Next I want to upgrade all my baking stuff to glass jars , I'm so over bags! lol. We have some nice metal containers we keep our flour, sugar and coffee in, but I like the idea of glass because you can see how much you have left. 

Have you done in a spicy upgrades recently? What do you think of my makeover? Are you shocked it took me seven months to finally finish, what was supposed to be a quick makeover? 


Lastly, how do you keep your spice jars?


Photobucket