-->

In Season: Strawberries

I love when Strawberries are in Season in California, because you can find them everywhere and I do mean everywhere! From farmers markets, the local grocery store and even on the street corner. This year I wanted to take advantage of them being in season and so affordable, I decided to try out a few new recipes and put my own simple twist on them. 


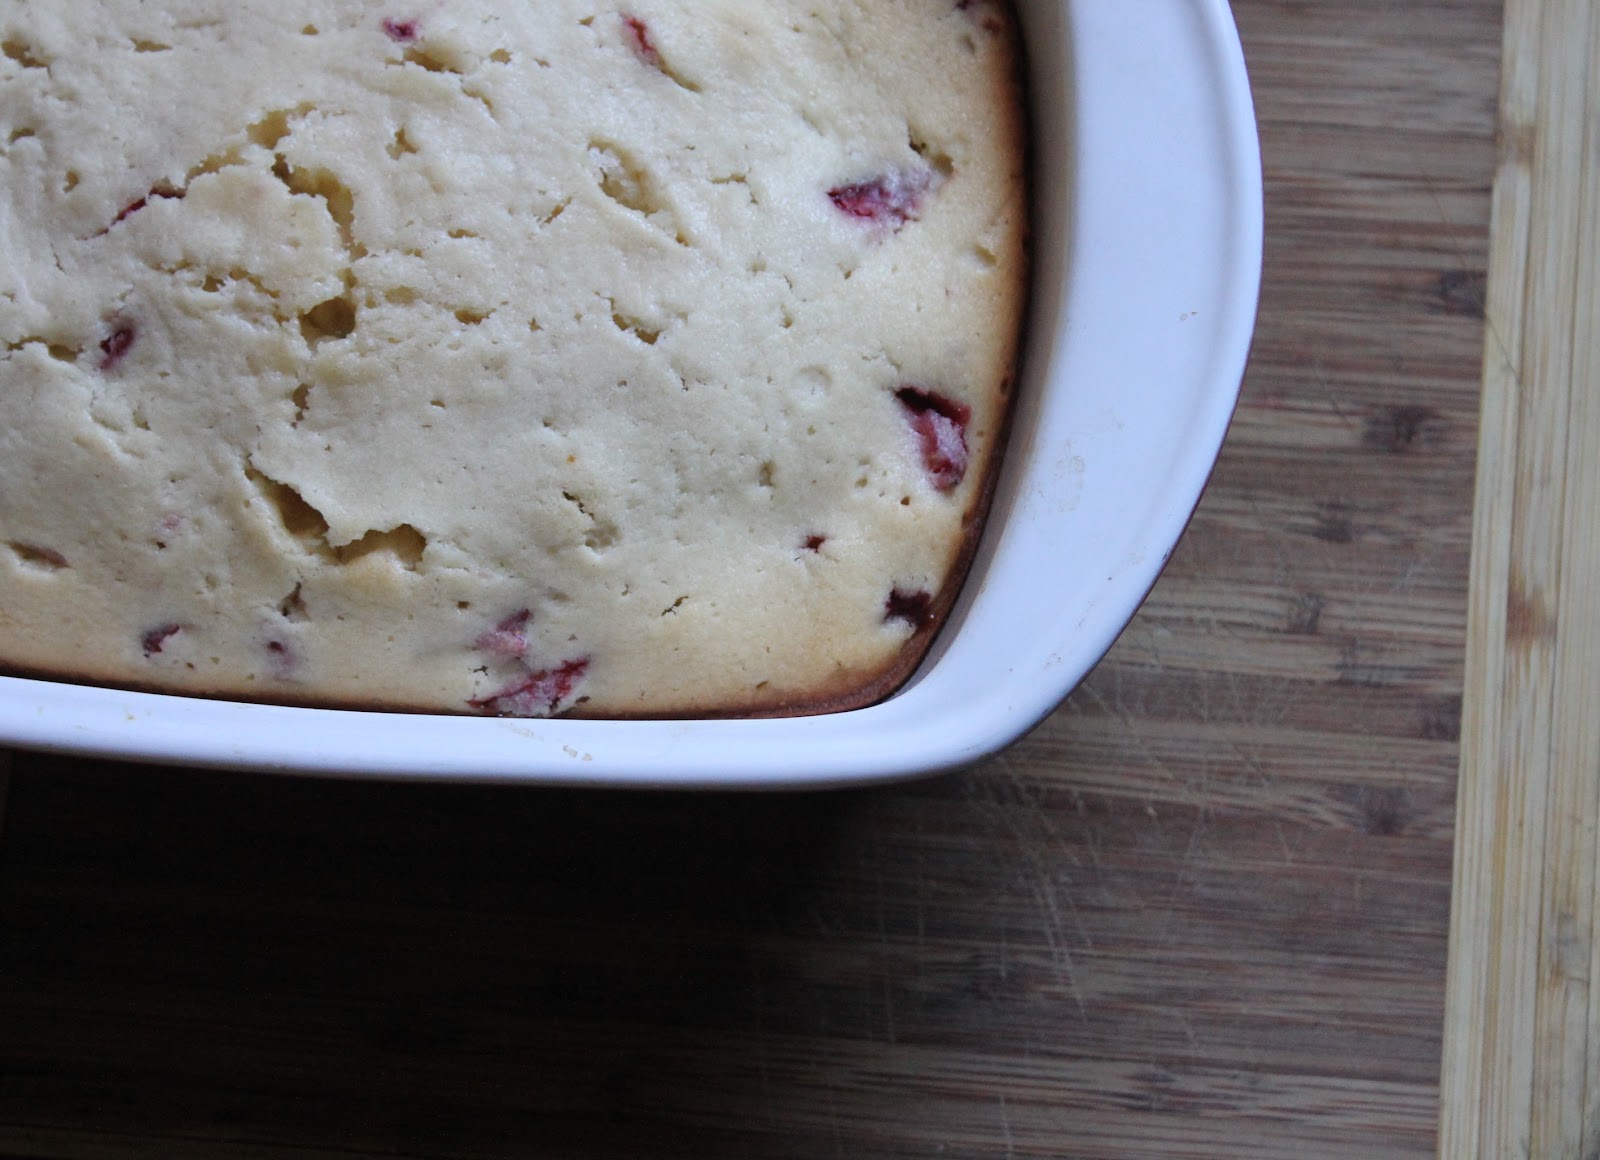
Strawberry Lemon Bread

I really like lemon bread, and thought combining fresh lemons (juice) with fresh strawberries would be oh so tasty! One problem, I've never made lemon bread before so I looked on Allrecipes.com for a simple recipe that, I could tweak just a little to make my own strawberry lemon bread recipe, and I'm happy to say my experiment worked! Here's the original recipe I used and my adapted recipe is below. 


Ingredients 

  • 1/2 cup unslated butter (room temp)
  • 1 cup sugar
  • 2 eggs
  • 2 large lemons juiced
  • 1 cup of fresh strawberrys (diced or sliced) 
  • 1 tablespoon of lemon extract 
  • 1 teaspoon of vanilla extract 
  • 1 1/2 cups all-purpose flour
  • 1 teaspoon baking powder
  • 1/8 teaspoon salt
  • 1/2 cup milk

Bake It


In a electric mixing bowl, cream butter and sugar. Beat in eggs on at a time, them lemon juice, lemon extract and vanilla extract. Combine flour, baking powder and salt; stir into creamed mixture alternately with milk. Gently toss strawberries in flour and mix in batter (by hand) By now your batter should smell um-mazing. Pour into a greased & floured 8-in. x 4-in. x 2-in. loaf pan. Bake at 350 degrees F for 45 minutes or until bread tests done. My mom taught me if the bread bounces back after you press on it, its done :) Let your bread cool for 5-10 mins in the pan before moving to a wire rack. 


Strawberry Cupcakes 


I've sort of been on a cupcake kick since planning Avery's first birthday party, I made a lot of cupcakes for his party and had so much fun! I wanted to make some yummy cupcakes for my sisters birthday, to take to her and decided to try out Martha Stewart's Strawberry Cupcake Recipe. I cut her recipe in half, and made 14 delicious cupcakes. The recipe below makes 34 cupcakes.


My pictures of the strawberry bread I took in natural light, I'm going to do my best to always take food pics in natural light, its amazing what a huge difference it makes! :) Hopefully your ba able to see how tasty these cupcakes were, my sis loved them! :)


Ingredients  


2 3/4 all purpose flour
1/2 cup of cake flour
1 tablespoon of baking powder
1 teaspoon of salt
1 cup of unsalted butter (two sticks) room temp
2 1/4 cup of sugar
1 1/2 teaspoons of vanilla extract
3 large eggs, plus one egg white 
1 cup of milk
2 cups of finely chopped strawberries (plus additional of garnish)


Bake It
Preheat oven to 350 degrees, line muffin tins with paper liners. Sift together both flours, I shifted 2x. Cream butter and sugar and vanilla together using an electric mixer until pale and fluffy. And eggs, egg white one at a time. On low speed add in half of the flour mixture, then half of milk alternating untill well combined. Fold in chopped strawberries by hand (with a spoon :)) Divide batter until baking cups until 3/4 full. Bake for 25-30 minutes until cake tester comes out clean. Place cupcake tins on wire rack for 15 mins, then carefully remove cupcakes from tin and place on wire rack, let them cool completely before frosting. 


Frosting 
The cupcakes turned out amazing! Seriously this is a good recipe to try out! Instead of making her Strawberry Merange Frosting, which sounded good but to complicated, I made a different strawberry frosting. I made a small batch of cream cheese frosting, again using Martha's recipe and added fresh chopped strawberries and blended my frosting really well then I cut a few larger pumper strawberries in half and squeezed the juice into the frosting. I continued to blend my frosting until it turned the palest shade of pink. Click here for a basic cream cheese frosting recipe.

What's your favorite thing to bake of make when strawberries are in season? If you have a strawberry recipe you'd like me to try out, email me or send me the link :) 


Oh I'm now on Instagram, @Mrsclh so far I'm loving it it:) I only have a few pics but should be fun to share pics of our everyday life :)

Photobucket

BBQ Carnitas Nachos

Right now in Northern California and pretty much everywhere in American its grilling season. This is the time of the year Hasani loves to grill. He grills, ribs (pork & beef) hot links, hot dogs, burgers. I love when he grills too :) He's gotten so so good over the past couple of years. just in case your curious his grill is charcoal. The other weekend we thinking about dinner early, when I suggested we grill nachos on the grill. i'm not a big steak person, so I suggested we make the nachos with pork, and turn the pork into Carnitas ( I love Carnitas!!) For all you newbies out that haven't had Carnitas before, here's the definition of 'Carnitas, literally "little meats," is a type of braised or roasted (often after first being fried) pork in Mexican cuisine


BBQ Carnitas Nachos


Slow Cooker Carnitas

I wanted the Carnitas to be tender and tasty, I looked online and found a great slow cooker Carnitas Recipe of Epicurious, click here for the recipe. 

2 pounds boneless country-style pork ribs or pork shoulder (Boston butt)
2 teaspoons salt { I used Kosher }
2 teaspoons ground black pepper
2 teaspoons dried oregano (preferably Mexican)
1/2 large onion, cut into 4 pieces
Fresh cilantro sprigs
1/2 Cup of Water or Chicken Broth

Place the meat in the slower cooker, and then add all ingredients and cover. Fully cooker between 4-6 hours on high. It took about 4 hours on high to cook the Carnitas in our slow cooker. After the pork is cooked, shred the meat. The meat should shred really easy. I like mine a little crispy. So we fried them lightly in Extra Virgin Olive Oil { a little oil on the bottom of the pan } until a little crispy

Making Nachos

I prefer using restaurant style tortilla chips, they just taste better. At our local International Market, you can buy a huge bag of freshly made tortilla chips for $1.99. We used our metal BBQ grill basket similar to this one to grill our Nachos in. 

1 Bag of Tortilla Chips
1 Cup of Cheddar Cheese
1 Cup of Monterrey Jack
Fresh Cilantro Sprigs
1 Large Tomato
1 Large Avacado
1 Cup of Sour Cream
1 Can of Re-fried Beans or Black Beans (cook on stove top)
Your Favorite Salsa 

Layer the bottom of the your grill pan with chips, beans, then Carnitas and cheese. Keep layering the chips, beans, meat and cheese. Finally top your nachos with Cilantro. Next carry your precious cargo outside to your already hot grill, place inside your hot grill until the cheese is melted and they tortilla chips looked crisp { about 10-15 mins } Resist the urge to start eating the nachos while still on the grill. 

These Nachos are perfect for parties and sharing with a group. Top with your favorite toppings. our are Avocado, Sour Cream, Southwestern Style Salsa & diced tomato. These nachos were freaking amazing!!! Like super Yumm!!! I loved the smokey flavor the BBQ gave the meat...yumm


Have you even BBQ nachos? What's your favorite food to eat grilled? Do you prefer Gas or Charcoal?  

Photobucket

Honey, There Goes the Counters

So its official my house is down a sink. I'm now skinless in my kitchen, oh and I have no counters. It's crazy, Sunday morning I woke up to me new reality of being sink and counter free. But let's back up a bit to Sat afternoon, demo time. As you know we are getting new counters! In an effort to keep costs down, we decided to DIY the old counter tops and backslash ourselves. Here's a reminder of how our kitchen looks pre-demo. 

I hope from this picture you can see our kitchen has good bones, tall cabinets that go all the way to the ceiling and they're solid wood which is a plus. We have big plans for our tiny kitchen, on a tiny budget! As with most of our DIY projects we've done over the years we plan on DIYing most of it, and getting help from the Professionals along the way { counters installed, electrical }   Here's my quick rundown of our plan, I will do an in-depth one very soon, since our old plan is dated. We are re-placing our the outdated tile counters with solid surface counters, new stainless steel sink, updating the back splash with subway tile, adding hardware and installing a vent hood. Currently we have an outdated ceiling vent, think old school ceiling vent. Not cute, freaking odd. We also plan on installing a pantry cabinet, again more on that in my kitchen post. Also new lighting, and paint lots of paint { cabinets, walls } Oh and new appliances, one at a time. 


Now back D-E-M-O. For anyone planning on removing old tile counter and a back splash I put together a How To. 


Supplies & Tools Needed


Face Mask
Safety Glasses 
Trash Bin
Broom
Heavy Metal Dust Pan
Crowbar
Hammer
Chisel 
Flat head screwdriver


After putting our safety glass and masks on, safety first! First we removed the old light switch / plug covers, then got down business. We started popping off the front of the tile using the nail mover part of the hammer. The popped off pretty easy. Once the corners were off, we were able to see how they attached the tile to the.


Not sure if you can tell in the picture above, but in the past tiles must have broken off because they where glued back on, not a good look. 


Then Hasani used the crowbar to pull up the top layer, the top layer was cement board. Using this technique we were able to remove a large layer of our old tile counters quickly.


While Hasani was working on removing the counters, I started working on the back splash. I used a metal chisel, we bought a long time ago to tear up our old tile floor in our kitchen and dining room. I placed the chisel underneath the tile and then hit the chisel with the hammer. The tile popped off one, two at a time.


After the dishwasher side was finished, we moved on to the other side of our small kitchen. Apply the same method, this side proved to be more messy. Lastly we removed the heavy old ceramic sink, good riddance to that sink!


Altogether it took about 2-3 hours to remove our old counter and back splash and plywood underneath the tile board. We cleaned as we went, making everything less messy and dusty. Here's my kitchen now, minus the old white tile with icky brown grout, minus our old fugly sink. We are making progress! I should mention in the pictures below, our stove is pushed way out of the area, we just wanted to make sure our fabricator / installer had easy access to our counters on both sides. After our kitchen demo, I placed my dinnerware back inside my cabinet for safe keeping.


Yesterday we had our counters measured for the template! We really like our fabricator / installer. He was very friendly and helpful and answered all of our questions! He also has a quick turn around time,we should get a phone call next week for a date to schedule our counters being installed!! After our install, I'll share our the cost breakdown and of course the after pictures! After the counters are installed, we'll be removing the old drywall and hanging new drywall. Since we plan on tiling we want a smooth surface as possible.

What do you think so far? Doesn't my kitchen look so much brighter with out the dark grout messing it up? Oh, I can't wait for paint and tile :)

Have to Demo-ed tile before, any helpful tips?

Photobucket

Pin of the Week

Plain and simple, I love how organized Martha Stewart inspires me to be! With our kitchen makeover beginning this weekend { we are demoing our counters } I plan on making the inside our our drawers and cabinets o-r-g-a-n-i-z-e-d.


Pin of the Week: Organizing Kitchen Drawers & Cabinets 


{ via Pinterest }

I'm in love with how everything has its special spot. Our kitchen is a 1/10 the size of Martha's so we will organize on a much much smaller scale. That means its easier when you have less space, riiiight? lol We shall we!


Follow me on Pinterest! Happy Pining :)


Photobucket

This Week

This week we were at Lowes 3 times, as much as I love the place, going there that much meant we where spending some money, lol. One trip we ordered our counters, I should have a sample of the color we chose after our counters are templates on Tuesday { its a really pretty color, and we opted not to go all white!! } The next trip, we bought some replacement outlet plugs for our living room, new air filter for our AC Unit and larger tomato cage for our garden. I know super random trip lol. Then next trip led to us making a another big purchase for our kitchen, that we where hoping to do at a later date, oh well. I'll share what we bought next week. Before our counter top abandonment at Lowes, Hasani had the cute idea to put Avery in the one of the model sinks, lol. I could have died, it was so freaking cute! My baby looked so cute in the sink, and oh my I loved how deep the sink was! 


I think my baby likes the pull down faucets too :)


He looks so tiny in this picture, and trust me he's not! lol 


Hope you all have a good weekend! Late today i'll be sharing my 'Pin of the Week' 
Photobucket

Kitchen Questions: Faucets

Everyday we are moving closer to our kitchen re-do, I'm happy to say we decided on a material and style for our new counters that we both love and we ordered them! We actually begin our demo this weekend on our old counters, but today  I'm talking about faucets. We couldn't very well keep our old barely works facet once we upgrade our counters, that's like getting a new car and buying old tires it just looks off. 


There are two types of faucets that I just LOVE and I'm tore between the two. I love the classic timeless look of a bridge faucet, they are just oh so pretty.  Then I also love the sleek goose neck style of the pull down facet, not to mention how extremely easy it makes filling large pots and washing dishes. Here's a better look at the two styles.


Kohler Bridge Faucet via Overstock { here }
Kraus Single Lever Pull Down Faucet { here }


It's hard to judge how pretty a faucet is without seeing it in kitchens, here's how the facet styles look in kitchens. Up first the Bridge Facet. I love these faucets, but they are be very pricey!! I've seen some upwards for 1K, no thanks :) That's our whole counter top budget, thank you very much, lol. But I have seen some more affordable options at Lowes for under $ 150.00 much better pricing. 


{ via Decorpad 


{ via Pinterest }


{ via Pinterest }


Next up is the Pull Down style faucet. I do love how sleek Pull Down faucets are, and love that they require less holes in the counter top, and preform double duty as a sprayer.


{ via here }


{ via Pinterest }


What style faucet to do your prefer in your kitchen? Have you recently upgraded your kitchen facet, if so what style did you go with?

Photobucket

Summer's in the House!

On Monday I mentioned my good friend Summer and her family drove up from Southern California all the way to Northern California to spend Avery's First Birthday with us and hang out with us for a few days!! It was so exciting to see my good friend!! Summer and I have been friends for over three years ago, we actually met while planning our weddings back in 2009thanks to theknot.com :) We just clicked! We talk all the time, though text, email and the phone { when we have free time, which is hard with tweens and babies wanting our attention, lol } We just get each other. 


Over the past three years we've been there for each other's huge life changes, getting married, and having babies. We both had baby boys last year that are just a few months apart!! In fact we planned our baby boys nurseries together, talking paint colors and fabric swatches and everything in between. She's made me fall in love with baking, so now we bake together over the phone :) And trust me before she gave me the courage to bake from scratch, I was all about boxes, lol. Now I know what cake flour is! She's been such a good friend to me though all my ups and downs, helped me get though difficult periods in my pregnancy last year. It feels amazing to have a friend, I've become so close with. There's just one small detail, we never actually met in person! 

So we she told me her family was coming up to visit and we'd get a chance to hang out in person, I did a happy dance! When we finally met, it didn't feel awkward, it was more a YAY! And to finally meet her husband and daughter Jai { who is such a sweetheart, kind and thoughtful and pretty! } was surreal, because I hear about them all the time and see pics etc. Then meeting her darling baby Asa, who I've wanted to meet and hold since the day he was born was amazing! Our baby boys became friends too! 


Jai playing with Asa & Avery. Look our babies matched! lol 


Not only did our babies get along, our husbands did too! And so did our tweens :)


We had so much fun on their visit to Sacramento. Summer and I got a chance to decorate together { Avery's Birthday Party} Go to Target, Grocery Shop, Thrift Shop together, hit up my favorite store Crate & Barrel, have lunch and dinner and hang out!! Oh and I loved that her and I got to shop my Target together, lol! Strolling there the asiles together talking and laughing was a blast! We also visited the State Capital together and waled the park grounds and I was able to show her where Hasani and I took our vows = Priceless. I'm so grateful Summer and I a lot of time to hang out. My family and I our heading to Southern California next month and I'm so looking forward to spending time with Summer and her family again!! You can read Summer's post about her visit here

Photobucket

Ice Cream Social Avery's 1st Birthday Party

I know every parent says, babies grow up so fast and its so true! My babies are getting big, and I use the term extremely loose on my big baby, the one who just graduated 6th grade, lol. But seriously the last year has flown by and I've treasured every moment I've had with Avery. Every every moment has been special , even the spit ups lol. We really wanted Avery to have a special celebration for his birthday that would be full of full and love. One day I was looking though and old Martha Stewart magazine, when I came across an adult Ice Cream Social party, I loved the idea of having an ice cream social 1st birthday party! The idea seemed so fitting, and since his first is June 3, what better way to kick off the hot Summer days ahead then cooling off with ice cream and fun toppings :)


I like making simple, yet sweet invitations when we have events. In the past I made our wedding invitations (click here) and my baby shower invites, so of course I had to make his one year birthday party invitations! My idea was to make the invitations modern with whimsical touches. I used publisher, my go to program for making prints & invitations. I wanted the invitation to feel like there was confetti or sprinkles falling down on the invite to celebrate Avery turning one. I also wanted to include cute information about Avery, for that I made mini Popsicle that had information about my baby, his first words, likes etc. I love the color chartreuse and it always reminds me of Avery's curtains when ever I see the color, so it popped up on his invite & envelopes. I bought the envelopes for Paper Source, my go to spot for envelopes they have an amazing color section and I'm a sucker for the style. I printed all the invites on our color printer at home using white card stock paper for my stash. It's hard to tell in the picture but in real life, the background of the invitation is light grey.


We decided the perfect spot for the party would be our backyard, you may remember we recently re-seeded our backyard lawn, which made a huge improvement on our grass situation. We had a crazy little heat wave a few days before the party, which sadly made some grass a little dry. We decided to use two six foot long tables for the desert and food table. We placed them under our vintage chalk board, yep its hung!! I rented the tables locally for only $ 7.00 each. It made it so practical to rent tables, instead of spending money on tables we'd only use once. I dressed up the white table cloths (also rented, super cheap) with two table cloths I found at Target, they reminded me of confetti and they were the perfect shade of blue. They were placed over the table cloths as runners, and added the perfect whimsical touch I was looking for.


I love making appetizers, they are easy and crowd pleasers the Appetizer menu: Mini Cheese burgers, Asian Chicken Salad, Meatball Wraps, Lumpia (Filipino Egg roll) Tortilla Chips & Salsa and Guacamole. All the food was homemade by me and my mom and everyone raved about the Lumpia. I used this recipe, and made close to 60 Lumpia for the party. The Lumpia was actually pretty easy to make & roll, I bought wrappers from our local International market in the freezer section. Everyone raved about how yummy the lumpia was! They went super fast, I think I only had three! One before the party, one during and one I begged Hasani for aftre the party lol. Here's the menu i made for the appetizers. 


For the desert table, I made two types of cupcakes. Vanilla Confetti Cupcakes with sprinkles, using Martha Stewart's recipe for Vanilla Cupcakes, I just added sprinkles to the batter before baking. I also made Banana Split cupcakes, they were so good and so freaking cute! Summer was such a sweetheart and came over early to help me set up the party and she kindly frosted and decorated the 20 something banana cupcakes and made to make sure my vision happened. Not only did Summer come early to help me out with the party stuff that morning, she and her family drove up from Southern California all the way to Northern California!!! Which meant so MUCH TO ME!! I'm doing a full recap of her visit and our friendship Tuesday, in the meantime checkout her blog for more details on the trip and and our friendship, love you Summer :) I loved how cute the cupcakes turned out! Again I used Martha Stewart's recipe from her cupcake book, I recently purchased. 


I also made M&M Peanut Butter bars using this recipe, but I added more 1/2 cup more brown sugar to make them moist. Last time i made them there were on the dry side and added extra sugar helped! My mom made Rice Crispy balls and placed them in cupcake wrappers to up the cute factor and it made it easier for little hands. Oh and the chocolate chip cookies, I bought those!


For drinks we had bottle water a few bottles of soda { Grape Crush & Cream Soda } I also served up Lemonade in large Mason jars and added lemons, renaming the it Lemony Lemonade. My sis helped out and made a large batch of my favorite summer drink, Passion Tea  Lemonade, tastes just like Starbucks and was a crowd pleasesr, even the little kids loved it. I shared how I make the drink here, last Summer on the blog. 


I also made little flags for all the straws using left over paper scraps from the bunting flags


We kept the decor simple, I made paper banners using an array of colorful paper bought on sale at Micheal. Steamers and colorful balloons helped spread the cheer. 


We had nine kiddos attending the party, and I wanted each one to go away with something sweet that would help them remember Avery's Ice Cream Social Birthday. I cut regular brown paper lunch bags in half using scrap book scissors and added ribbon handles so the bags could be carried, then added a 'Thank You' label on the front of the bag along with mini bunting flags that matched the big bunting flags. I used left over paper scraps from the flags for the bags. Inside each bag contained a canning jar with sprinkles inside and an ice cream cone with a not that said, 'Just Add Ice Cream & Top With Sprinkles


Everyone enjoyed catching up with family and friends.


After our guests enjoyed food and deserts, we moved the food inside and brought out the ice cream! Hasani served up the ice cream to all the little kids and then the adults helped themselves to ice cream. We had a little toppings bar that consisted of: Reeses's Pieces, Kit Kat Bars, M&Ms, Gummy Worms and Cherries. I used my small white fruit bowls for the toppings and placed the cheeries in a small half pint jar. 


Next its was time for Avery to enjoy is mini cake. I found a mini cake pan set at Micheal's and used a 40% off coupon spending only $ 3.60 on the set. The mini cake was banana with vanilla cream cheese frosting, yumm! Orgianlly I planned to frost the entire cake, but at the last minute I decided frosting only the layers would be perfect. We placed Avery's highchair outside under a tree, and tied a bunch of balloons too it, making the first cake tasting extra sweet. 


We all gathered around Avery out of the sun { it was 90 degrees that day } and sung happy brithday to Avery. I placed his cake on his high chair, thinking he'd smash is like crazy. Nope not my child, instead his little chubby hands picked up the entire cake and placed it his mouth only getting a little frosting in it! I could have died right there, it was freaking cute!! All of our family and friends snapped pictures like crazy of Avery eating his cake! it was such a special momment! I'm glad we got tons of pictures :) 


I hoped you all enjoyed seeing Avery's first birthday party!! The day was so much fun! I love him so much and like I said, its hard to believe we now have a one year old, I know for a fact I'll continue to enjoy all the little moments the next 12 months leading up to his next birthday. 

Photobucket