-->

Pin of the Week

I'm back with another installment of my 'Pin of the Week.' I have cake on my mind this week. I've always wanted to bake a bundt cake an with Easter just around the corner I plan on making this cake! 

Pin of the Week: Pink Lemonade Cake 

This Easter will also be Avery's first, so I want to make it extra special and plan on making my boys a yummy brunch and this will be the perfect after brunch sweets. I've serve Avery a 'baby-friendly menu' 


What's your favorite Easter sweets dish? Have you ever made a bundt cake, any baking tips?

Photobucket

Who Knew? Kmart

I popped into Kmart last night to look around, part of my personal goal to shop at 'new to me stores'. Remember when I lucked out earlier this month and found a Chevron Ikat Mirror at JCP's?  When I was walking around Kmart, I surprised to see what looks to be a new line of dinner and kitchenware from Sandra Lee. My apologizes in advance for the cell phone pictures. 


Cute prep bowls, three for $ 9.99


I love white dinner and think the large white berry basket is darling. She also has lots of cute service ware. 


I love these square service ware bowls, three for $ 9.99 


I'm glad I popped into Kmart, I plan on going back in there over the weekend, when I have more time to shop. I really like this serving set {a picture from Kmart's website} for $ 19.99


Have you been into Kmart lately? Or another store that surprised you lately?  

Photobucket

Garden Gates

The gate to our backyard (which is on the side our Rancher) is in serious need of an upgrade! It's one of those outside projects we put off. Which is crazy since, we did some many other outside DIY updates: painted our house, installed sod, redid our garden beds, painted our front door and prettied up our front porch to name a several  few projects. To be honest we rarely use our side gate, it mostly used for bringing the lawn mower out to mow the lawn. BUT, its an eyesore and its about time we fixed, after three years of it looking a mess.


The plan is to move our excising fence forward about 8 feet which will extend the interior side our backyard and give is a spot to place our trash, recycle and green waste containers. Right now they are lazily placed on the side our house and I want them out of site! I'm thinking we keep in the same spot they are in now, except along the fence line, and place screen in front our them. 

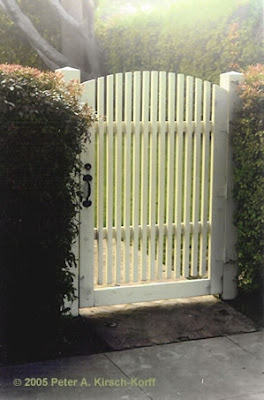
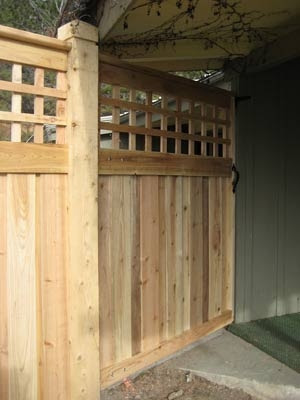
After we bring our fence line forward, we'll need to build a new gate. This is the fun part! I've been gathering ideas and trying to 'pin-point' our gate style. Do we want a single gate, a double gate? Curved? With lattice? With a door handle? Who know there were so many pretty & cool ideas. Oh, and after we do our gate update, I'll be officially calling the gate, our garden gate :) I've seen so many gates styles and narrowed it down to our musts: Create privacy, Pleasing to the Eye, Go with the style of our house, Can be locked. Below are Gate Styles I Like.


I've always loved the looked of gates with a top curved. I love how this gate is private and pretty. I also like the black exposed hardware.


{via Pinterest}

Again, I love the curve on the gate. I would place the boards closer together.


{via Pinterest}

I think the lattice on top of this gate is very pretty. I would want our gate lower and not so close to our eves. I think a little breathing room is a good thing :)


{via Pinterest}

I pretty much adore everything about this gate. First, I love that house is shingles (like our home) I like the pretty door handle and the down curve of the gate. Most door curved gates I looked at didn't offer much privacy, this gate offers plenty of privacy. I also like that this garden gate reminds me of a pretty door. Another plus, is they painted the gate to match the house and it works seamlessly! I also love the blooming vines. We have vines on the side our our house, there are finally blooming again and I would love add more on the side our house. 


Obviously this gate won't work for our needs, since we want a private gate. But I love the large decorative exposed hinges. It really gives this garden gate a custom look. 


{via Pinterest}

Now that I've shared with you gate styles I like, here's gate hardware I also like. This decorative gate kit comes with everything (I like the exposed hinges, and pretty handle) The gate kit style is kind-of cottage like, and I like that look and think it could work well with our home style. 


Out of all the gates, I've been looking at I favor the one below the most. I think with a few modification to fit our needs we could make a pretty gate very similar to this one. 


{via Pinterest}

After narrowing down the gate styles, I noticed I'm most drawn to gates that a painted. Which is odd, because typically I don't like fences or gates that are painted. I prefer the natural wood, I usually cringe when I see a yellow house, and then the attached fence is also painted yellow. But since were about to do our gate upgrade, I'm rethinking my previous stance and would be open to painting our gate white, but I would want to keep our fence natural wood. 

What gate style do you prefer most? Do you like painted garden gates or natural?


Photobucket

Getting Caulky

I was a little cocky going into the weekend thinking we'd wrap-up our DIY Door Casing Project we've been working on, boy was I wrong! But that's how most DIY Projects go, now that we have a little one again & a tween working on a big school project. The good news is, all the framing of our doorways is complete! The last time you saw our doorway casings, we framed our doorways with thick molding (almost 4 inches thick) and added a simple header using a 1x1 and a 2x1. You can read more about our inspiration for the DIY Casing Project here. Here's how it looked the last time you saw our door ways.


And the bottom of our baseboards looked 5ike this (not cute) 


Since then, we added a top trim piece to our doorways using two 1x1s and 2x1 in the middle section. I love how simple the doorway headers now look, to me they really fit the style of our California Rancher. 


Then we trimmed out the bottom of the doorway piece with the 4x1 piece, with mitered corner cuts. To hide the inside seam of the doorways, we used pieces of lattice. Again we mitered each corner cut. Oh, when I say 'we' I mean Hasani! I marked all the cuts using a 45 degree angle and he made all the cuts. 


Can I just say how much I'm also in LOVE with the bottom of our doorways! They look so polished and nice next to our existing baseboards! I like I said I'm in love! 


After the doorways were finished being framed out, it was time for my to get caulky. I had a ton of wood to caulk, a ton! For all the seams, I used caulk to fill in the nail holes and knots in the wood I used wood filler. Our doorway casing project has started a snowball effect around our house. As I've already mentioned, I plan on repainting the our baseboard trim (too bad I didn't get to it over the weekend) So with that said, after seeing how amazing our doorways were looking we decided it was finally time to replace our old dated small front door trim. We like our existing doorway trim that surrounds our garage door, so we bought the same trim. 


While Hasani was removing the old front door trim, he discovered a key hidden in the wall. Crazy huh? 


Next Hasani trimmed our existing baseboards to fit our new wider width door trim. Then I measured the miter corners and Hasani did the mitered cuts. Before Hasani nailed the new doorway trim in, I cleaned up all the drywall with a broom. It felt so good, it get to clean behind the old door trim, lol.  If you've ever removed an old piece of trim, you know exactly what I'm talking about, lol. Yup, I just added another project to my re-painting trim project and I'll be touching up paint on our front door surrounds. 


Here's how the door looks right now, pre-caulk and glossy white paint. 


Another snowball affect: we're finally getting around to added a new floor transition piece between the living room and dining room doorway. We bought an unfinished oak transition, I stained the piece Early American with left over stain from refinishing our hardwood floors last year and then applied a clean coat of polythene (also a left over from our hardwood floors) The new transition piece will help add a cohesive look between our original hardwood floors and our faux-wood floors, we installed two years ago replacing our ugly cracked tile. I'm really happy about this 'snowball affect,' because floor transitions are a good thing.


Next we need to sand, prime and then finally paint our new doorway casings and install our new doorway transition piece. Even though there's still a lot to do, I'm super excited about how doorways look! Oh, how I can't wait to see our DIY Door Casing completed and our baseboards glossy white again. I hope by Monday night, after the baby and tween head to bed, I'll be sanding and then priming our doorway casings and new front door trim. 


What do you think of our DIY Door Casing Project so far? Are you in love with the bottom of our doorway baseboards like I am? What do you think our our doorway headers, perfect addition to our little rancher? 


Any snowball effect projects happen in your casa lately? Have you found anything odd when your removed baseboards in the past like we have? 


Photobucket

Pin of the Week

On my mind this week is Parties! Which has a had a huge affect of on my pinning pretty ideas for Avery's birthday party and other fun parties (BBQ, Summer Fling Party, Back to School Party etc). I love parties at home, especially in backyards, after all we had our Wedding Reception in our backyard (see here). The my 'Pin of the Week' is all about pretty simple back yard parties!


Pin of the Week: Backyard Party 


What's your favorite Pin of the Week? Feel free to include the link? Do you love backyard parties as much as I do? Are you planning on having one soon?

Photobucket

This Week

This week at CLH. I recently received the newest issue of BHG and couldn't wait to try this recipe Bacon and Egg Muffins. I've been looking for easy recipes that I can make ahead for the week for my family to enjoy a quick breakfast in the mornings. Tabari's not much a cereal person, and he needs to eat more than toast and jelly. I had all the ingredients in my cabinets and fridge, so I said why not. 


Here's the 'done' picture from BHG, click here for the recipe. I followed the recipe exactly, and I think they tasted OK. I'll think I'll retry the recipe and add in some diced chilies to give them a little kick and maybe more eggs. I will say they held up very nicely over the week an Tabari and Hasani liked them, so that's a plus. 


Avery's is such a little helper. He remained me not to leave out Netflix out within his reach. They grow so fast. 


Since, I'm on the subject of Netflix here's our at home movies for the week: Footloose (2011) and Real Steal.   We deiced to increase our at home movies from one at a time to two at a time, that way we can watch new releases & a random my pick movie.  Oh, and Hasani rolled his eyes at Footloose (my random pick) I loved the classic cheesy 80's Footloose, SJP was totally underused in that movie, lol. So it was a must for my to see the new version, just not in public, lol. 


On Wednesday, Avery and I headed to Micheals with a 40% coupon, I was planning on using to buy a cake pan with. I couldn't find the size I need, so I'll be shopping another Micheal's or Joanns this weekend.


It was a quiet week at CLH. Which means we'll have a crazy busy weekend. We'll have our casing on our doorways done tonight, and be painting trim all weekend! 

How was your week? Have you seen the new Footloose Movie, was it a good? A hot mess? Any  favorite 80's movie you want Hollywood to remake, or would be upset if they did? 

Photobucket

Small Space Big Style

As you all know, we have a small home. So whenever I come across an amazing house that is small on the square footage, but big on smile I do a happy dance! Because it seems like magazines only feature large homes, I consider anything over 1600sq ft big, since ours hovers in the 1000sq ft range. I guess in the 1950's in California, they just made-em small :) But were snug and happy in our little rancher and love our big backyard, so its all good and I hate cleaning so I think the smaller space is perfect us (at this moment) I did some digging around on the on Better Homes and Gardens to find pretty small living rooms, that I like. 


What I like about this small living room: Not afraid to use color on the drapes, light blue slip covered sofa. Moldings on the doorway make the room look larger, also hanging the curtains makes the ceiling appear larger. 
{ via BHG}

What I like about this small living room: The light paint color on the walls makes the room feel larger and keeps the nice sunlight in. Large fun artwork add a nice pop. The furniture is in a tailored style, yet relaxed. The room also has a little 'office space nook area' 


What I like about this small living room: I love all the detail in this spot in the living room, pretty artwork dramatic curtains and large accessories all work well in this living room.

{via BHG}

Ooh, look casings on the doorways. I'm just a tad bit in love with casings lately since we're in the process of adding them to our home. I like the mix of traditional style with fun modern touches. 

{via BHG}

Regardless of how many sq feet your home is, its all about making the space work for your needs, that's one lesson I've learned while slowly re-doing our home inch by inch.  

In your opinion, what is more difficult to decorate a living room space or large? In my opinion, I say small :)  lol But I will say, it can be very difficult to decorate a large living room and give it a cozy lived in feeling :) 

What have you done to create a cozy & inviting living room in (be it small or big) in your home? 

Photobucket

Adding Casing to Our Doorways

For a while I've wanted to add some molding to our two doorways in , one leads to our kitchen and the other to our hallway. I didn't think adding molding would make a huge improvement in our home, until I saw a great How To on the blog A Charming Nest. They transformed plain doorways into a lovely architectural feature, that added so much character to their home. After seeing their pretty transformation, I knew for sure we had to upgrade the look of our two doorways. I really like the pretty details of A Charming Nest's casing trim and I like the ones I found on Tar Paper Crane


Pretty!! Love all the details :)


After showing Hasani what I wanted to do, we went shopping at Lowes. We stopped into Lowes and decided to go buy wood for our door casings instead of buying MDF. We decided on wood because, all the of our baseboards are wood and wanted to keep the same look thought out our home to keep everything consistent. We went though all the wood at Lowes, and bought the straightest and smooth wood we could find. 


6: 4x8 (each one 1 inch thick) 
4: 2x8 (each one 1 inch thick) 
4: 1x8 (each one 1 inch thick)
6: Lattice pieces 


We took all of our pictures down near the walls we would be added trim to. Next Hasani has sections of the bottom baseboards on both sides of the the doorway. Then we measured marked each board and made the cuts. So far both the front and back wood trim and header is on the doorways. We love the look of the doorway casing trim in the 1st picture above, however we have to keep ours looking more simpler since we have a 1950's California Rancher. You know so it doesn't look overdone. Here's how's ours currently looks, still much much more work to be done. 


Oh, I'm already in love how with how the doorways look! Even there were only halfway done. The thick almost 4 inches wide (to me) wood trim really makes our average sized doorway appear larger and the ceilings look taller. I like when little updates make huge improvements.  


After going back and forth over leaving the top of the header plain or adding a little molding detail, we've decided to a little trim to give it a more finished look. We still have a lot left to do, I'd say were about 50% done. 


We still need to: add miter corners on the inside if the doorways for a nice finished look. Add latices (thin strips of wood) on the inside of the doorways to hide seams where the wood meets the inside frame of the doorway. Fill all imperfections for wood filler, lots of wood filler! Sand, Prime then paint all the trim glossy white! We also plan to change out our front door trim, with trim that matches are garage door trim, since both over those doors are can be seen from the same room, we want to keep things consistent. 


I plan on paint lots and lots of trim over the next few days. I'm going to repaint all the trim in our hallways and touch up trim paint in our living room. I think I mentioned before that, some of our white trim got stained while Hasani and my Dad where finishing our Hardwood Floors last year. I was way too pregnant huge and tried to attempt re-painting the trim. My Dad did some touch ups for me in the Nursery (thanks Dad) Anyways I've been putting off re-painting the trim for far too long. We should be done in a few days, and I'll have more before, during and after pictures to share!


What do you think of our new door way look so far? Have you ever added casing to your doorways? Any project, like trim paining you've been putting off like me?


Photobucket