-->

Project Nursery: Hemming & Hawing

Have you ever came across an picture that pretty much inspired room in your home? Well this happened to me, I came across this Nursery via Style at Home and was in love with the shade of green drapes the mom chose of her sons nursery. After seeing that image, I couldn't get that color out of my head and knew our baby's nursery had to have this pretty shade of green in the room. Here's my inspiration color.


So my hunt of this shade of green, I refer to as 'artichoke pear' began. I started my search for this shade long before I knew if we were having a boy or girl, I just knew the color works well for either gender. I started my search looking at local fabric stores, but the colors that came close all felt bulky way to heavy for a nursery. So I order a few fabric swatches from both Calico Corners and Fabric.com. All the fabric swatches were WAY off, in my experience its so worth it to spend a buck or two. So not the color were going for.


Fast forward a few weeks and I was still on the hunt for the perfect shade of Artichoke Pear (don't you love when you make up color names!) I had pretty much given up hope of ever finding the the perfect shade of green for curtains, until browsing online at Ikea & West Elm. 


I was stunned both of the drapes looked like color I'm in love with, then a day to two later I was reading the nursery reveal on Hitting My Stride and she used the Ikea curtains!! They looked more lime green than yellowish green in her pictures, but I decided a trip to Ikea & West Elm was needed. I loved that both curtains were linen, which I think gives a softer look overall. Here were my two options. On left Ikea Ania and the Right West Elm Linen Cotton Grommet--- the pretty pic of the West Elm one make it so tempting don't they :)


There's a big price difference between the two, Ikea $ 49.99 for a pair of panels you DIY the hem, and the West Elm $64.00 per panel for 96 inch length. Obviously I was hoping wishing g and praying the Ikea panels would be the perfect fit, because its Big Difference in cost. So I went to Ikea first, since I had a few items I needed to buy there. Under that God awful florescent lighting I found the perfect match. The panels were super heavy and look nothing like the online picture which looks muted and blah. I bought on the panels and to be on the safe side headed to West Elm....which were also the perfect color match, but my Ikea ones were oh $ 78 bucks less. Again big difference. Here's the naked sliding glass doors before.


One thing I love about buying Ikea curtain is the choose your own hem option, its so simple. I just used the iron on hem tape, instead of sewing the hem. To find the 'perfect length' for these curtains, I hung them and them placed a pin where I wanted to hem them. Next I took them down and pinned the hem into place, and then used the iron on hem tape. I kept the hem nice wide, just in case I line these panels in the future. 


I also like the option these curtains to use the rod pocket or the back tab. I prefer the using the back tab, because it that pinch pleated look (with out the cost or sewing hassle) No matter how much I Iron these linen panels they would not de-wrinkle, I guess its time to replace my iron or get a hand steamer! You can see how the this shade varies depending on light. 


Regardless of the wrinkles, I adore how the curtains look in the nursery. The curtains are heavy and have a nice weight to them, and let light filter in. This is how the color looks in the early morning light.


If over the Summer they let too much light in during the morning and while our son is taking naps, I plan on adding a drapery lining to them. I'm so glad I was finally able to find the perfect shade of artichoke pear for my sons nursery. For the rod I used a simple black rod from Target, just ignore the crap in the stairs leading out to the backyard & I promise to have better pictures next week, I took these early this morning around 7 am  


So glad we are making progress. I've been a busy prego lady this week and will have lots to share next week :) 


Again, I love this shade against the light grey walls. What do you think?


Follow Along: As we create a nursery for our baby boy due in June 2011. From the beginning; Nursery Bare Bones, Paint Makes the Difference, Bye Bye Boob Light

Photobucket

Rug Hunt Begins!

Now that we refinished our hardwood floors and re-stained them a a rich brown color, its time to start thinking about area rugs. I promise to have more pictures + the how to of our hard floors soon! Were making a few changes in the living room (more on that later) Its funny, I never realized how naked our floors were until after having them refinished. After much discussion, were looking for an 5 x 8 rug that should still give plenty of coverage and anchor our furniture without covering up to much over our pretty new floors. We want the rug to be baby, kid, dog and us friendly without breaking the bank.  Here's our top Rug Contenders:

We are pretty much on a rug kick from West Elm, they just have an awesome selection of rugs, many at great prices. I adore this Herringbone Rug, its such a subtle pattern i could see it looking so good underfoot. 


We both like the Jute Dote Rug, this may work even better then the Herringbone rug. 


We can't for get about our small entryway, we've opted to kick our existing rug to the curb for something more playful & colorful. I've been digging deep navy blues lately and love this rug for our entryway. It's such a cute playful rug.


Luckily for us our rug search so far has been small -- going back and forth between the area rugs for our space. Hopefully West Elm's rugs go on sale for at least 15% off! Lol, that will help make our decision much easier. 

Which rug do you like more the Herringbone Rug or the Jute Dot Rug?

Photobucket

Earth Day Artwork

In honor in Earth Day, I checked out  Esty looking for a pretty print that reminds us year long to be good to our environment. I think this Recycle Print is truly pretty and would make a perfect statement anywhere in your home. In my home I'd place this in the kitchen as a daily reminder.


(via here)

This year my family and I will be celebrating Earth Day by planting some flowers in our garden beds. Maybe we'll get a veggie garden going soon, I would LOVE that :)

Any special plans for Earth Day?


Photobucket

Project Nursery: Bye Bye Boob Light

It's been a few weeks since sharing updates in our Nursery. So far we've painted the walls a soft grey, beefed up the baseboards with extra molding and refinished the hardwood floors in the nursery. Next up on our to-do list was changing out the boob light fixture!! It's the last boob light fixture in our house, good riddance!

Before:


I love pretty lights and wanted something unqie and not to babyish, and of course like our other light fixtures that we replaced, I was drawn to drum lights. Big surprise, no.  After all we have a pendant drum light in the dining room, a modern wood style drum pendant in Tabari's room and a mix of drum shade / chandelier in our bedroom. But back to the lighting hunt for the nursery.


Lighting Requirements:


Needs to be close the ceiling
Pretty Turned On & Off 
Gender Neutral 
Unique ( to me )
Fits scale of room ( no dinky light for me )


I always come across pretty lighting on Overstock.com.! I swear I only buy from them if they email me a coupon or if I find one online! I know silly, but hey thrifty is a good thing :)
So I fell in LOVE with this light fixture and knew it would be perfect in the nursery, and Mr. CLH agreed. Here's the light fixture, I found. 


It fit all the requirements and had good reviews! But, my loving husband said it was a PITA to install because of the way the 'hinges' attach to the drum shade. We planned on installing medallion along with the fixture, but it was being a pesky little brat, so its going back to Home Depot, I'll use that refund for flowers in our garden bed, lol. Regardless of how annoying it was to install, I adore this light fixture and love how the crystal adds a little bing to the nursery without coming across as too 'girl'. Here's the light fixture in my baby boy's nursery, yup we still need to paint around it, so just ignore that for now :)

After:


I only paid $ 100.80 for the light fixture after my using my 10% off coupon. Oh I should mention www.Lampsplus.com sells the exact same light fixture for $ 264.99! I paid less than half their price, crazy huh. Oh that's why I love the internet! 


Now I just love walking into the room and flipping on the light, we need to install a dimmer switch STAT, this beauty holds three (count them three) 60w light bulbs. I chose to use the GE Reveal light bulbs which is a truer appearance of color in the room.


What do you think of the nursery lighting?  


Follow Along: As we create a nursery for our baby boy due in June 2011: From the beginning; Nursery Bare Bones, Paint Makes the Difference 

Photobucket

From the Dollar Bin

Last night my mom and I were doing a little shopping at Michaels and stopped to check out their latest offerings in the Dollar Bin Aisle. It's a great aisle filled with lots of cute little stuff from pencil, to candle holders, coasted and dish towels etc. I was super happy when I came across the BEST, in my opinion find EVER in the Dollar Bin section.  What did I find you ask? 


Well, I found a cute Cream & Sugar set for only a buck each! They are so cutest things, so looking forward to using them :) The little open milk carton for the cream is so cute! A perfect pair.


After I paid for my items, I kept thinking this so reminds me of Crate & Barrel. You know how some items scream certain stores, well this cute set kept screaming Crate & Barrel. So I got home looked online and sure enough Crate & Barrel sells almost the exact same set for $ 16.95!! But, I only paid two bucks for my set WooHoo!!! { yep this deserves 3 exclamation points }


So if your in the market for a cute Cream & Sugar set, get in your car and head to Michaels Dollar aisle, you just never know what you might find!


Photobucket

Giveaway Book Winner!

Thanks everyone who entered the book giveaway for '101 Things I Hate About Your House'


A big Congrats to Entry # 8 Abby! 


Abby, I hope you find this book a fun read :) Please email me chiclittlehouse@gmail.com and I will have the book mailed out to you ASAP :)


Photobucket

Well Hello, Refinished Hardwood Floors!

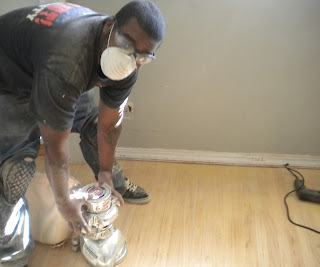
Remember my whole house project I mentioned a couple weeks back? Well over the past two weekends, we took the plunge and refinished our hardwood floors. DIY style of course! This isn't the first time we've talcked a whole house project DIY style, remember we painted our entire house in a weekend. We saved a bunch of moohlah and a blast even though its hard work. Let's talk about how our floors originally looked when we moved into our 1956 rancher. Plus why we waited to until my 7th month of pregnancy before taking on this dusty / smelly project. Here's a reminder how our floors once looked like.


One thing that we really loved about our Rancher was the wood floors & no carpet, which is a plus when your husband has asthma and a slew of allergies and your kid inherited a few too! Originally Mr. CLH & I talked about having our floors refinished when we fist moved into our house January 2009 - but we decided to wait and do it later. I'm so glad we did! Why? Well at the time we were still discovering our style in our little Rancher and most likely would have went with a color that now isn't US. And your home should always feel like you, right?


We started talking about going the DIY route refinishing our floors ourselves after finding out I was pregnant, basically it was now or never or 7 months later. After having a conversation with my dad when he was in town visiting, he offered to help Mr. CLH on the project and refinish the floors. We wanted to wait until the weather warmed up, which improves dry time, working conditions & moral. So finally we choose a date, the first weekend in April. Which lands on my birthday making this an awesome birthday present from my husband and my dad to me. 


After much talk and looking at stain options, Mr. CLH and I decided to go with Early American by Minwax for a couple of reasons. We liked how the color looked on our test we did in the closet. A deep color without being too dark. We loved the variations in the wood grain with the stan, to us thats the beauty of or refinishing old hardwood floors. We loved the imperfections and the 'movement' the stain created on the floors. 


Here's some before pictures of our original hardwood floors, in their orange glory. In some places our wood floors were still in 'solid condition' others not so much. Which is not too surprising since the floors are over 50 years old and we learned from our neighbors there was once carpet in the entire house covering up the floors. 


I'm loving our floors now, the rich dark floors so much! Removing the old finish and sanding down the floors to the natural wood grain, staining them and ploying makes the house feel CLEAN. Let me tell you no matter how ofter I would swiffer or clean the floors, they never looked 1/2 this good. They really help ground our space and make our home appear larger. The dark floors had the same affect in our tiny dining room.

The nusery floors before


After being sanding down to the bare wood, love how fresh the bare wood looked. Look at cute Mojo peaking though the door.


Nusery floors now = LOVE
I'll have more pictures of our hardwoods floors soon. Mr. CLH is working on a 'How To' post and adding up the cost for refinishing our floors DIY style. Trust me we SAVED a lot of money, had mini break downs from frustration (me) got giddy over looking at color, but in the end it was all worth it. 

What do you think of our refinished hardwood floors?

Photobucket

Book Review & Giveaway!

{ This Giveaway is Now Closed }


I was recently asked to write a book review on one of my favorite topics home decor! The book is called '101 Things I Hate About Your House' the book is written by Interior Designer James Swan. He has been in the business over 20 years and a is a featured design partner with Ballard Designs.


My Review

I've had a blast reading this book, that's focused on helping the everyday homeowner (regardless or house size) to see their house with a critical eye or view how guests perceive their homes, which is very helpful. The book covers your entire home from the entry way to guestrooms. I love how James Swan breaks down the 'no nos' we all do in our homes in a humorous way.

Some decorating sins we've all been guilty of or currently guilty of:
# 51 Artless Walls
# 61 Bare Naked Windows { I'm currently guilty of this in our master bedroom! }
# 95 Piles of Shoes


The book is also filled with pretty illustrations, however I preferred the 'real' pictures over them. This is for sure a book you'll wanna read, its available on Amazon.com here


I love this quote from James Swan in the introduction:

The plan is simple; laugh a bit, learn a bit, most important, come to love your home as you've never loved it before. Now That's beautiful

I love that, its everyone goal to have a home that's both functional, beautiful and inviting every time we walk in our front door.

Giveaway Information

How To Enter: Leave a Comment on My Blog ( please include your name and email address in your message ) The winner will be selected via Random.org Giveaway is open to US residents only.

Giveaway Starts: Wednesday 4/13/11

Giveaway Ends: Monday 4/18/11

Number of Winners: One

Bonus Question: Which Design Sin Have You Committed?


Photobucket

Blurry Days

My apologies for dissapearing last week! The past two weekends and last week were so blurry. We had so many projects on our plates & I had very limited internet access in the evenings, hence no time to blog! Here's few pictures of what our life been like the past few days. I've been doing a lot of sitting out the front porch, glad our trees is finally starting to turn green again & looking at the dead plants in hanging planters. Hopefully I can find the same succulent plants I originally planted, I love how they overhang on the planters. 


The ledges I built for our entryway to hold our Wedding Pictures, now holds misc. items. Nothing says classy like misc. crap greeting you at the front door { painters tape, floor cleaner, water bottles and Styrofoam cups! } Just to name a few :)


Finally one my favorite pictures taken over the last two weekends. This picture makes me love my husband even more!! And also realize when heavy objects touch the baseboards, its time to re-paint! Cheers to paint touch ups! 


Any ideas what we've been up to in our little Casa?

Photobucket