-->

DIY Ottoman Ideas

A few days ago I shared that we are thinking our switching out our coffee table we've had for almost three years for a sqaure ottoman that will double as our coffee table. We're still undecided, but HUGE thank you for all the comments :) I love getting different opinions. It's no shocker, we love to save money when we can and DIY projects, which got me thinking about all the amazing DIY ottomans I've seen all over blogland. I've been thinking about DIYing and entire ottoman or tweaking an excisting ottoman I buy from a local store or on Craigslist. I'm no stranger to tweaking a ottoman, remember the vintage ottoman I re-upholstered for Avery's nusery? His ottoman came out nice, if I do say so my self, you can read more about the project here


The idea of buying an existing ottoman is really appealing to me, I like the idea of transforming an existing piece into a custom made-for-you-only piece. I put together a few ottoman ideas using an existing ottoman, tweaked into a custom piece. Below is an idea, of what II'm considering. 


1. I like this square ottoman I found at Kirland's, it's 36' by 36' which is a good size and would look nice in our space. I like the shape of the legs, but no the color. I would spray paint the existing ottoman feet Oil Rubbed Bronze (same color as Avery's ottoman's feet) I also like the idea of added Caster to the bottom on the feet, kind of like this below.


{ via here }


2. I love pretty patterned fabric and think another layer of pattern would look really pretty in our living room. I'm torn between the navy and a neutral patterned fabric. The neutral fabric is pretty, but it might blend too much with our sofa and chairs, but looking at this natural ottoman on top of a natural fiber rug (like ours) makes me think it could work! 


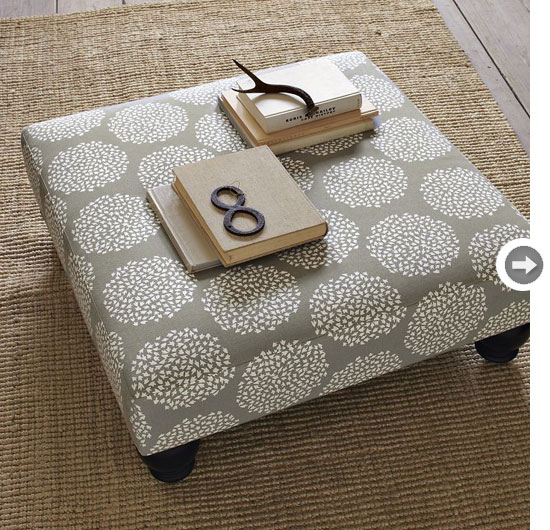
{ via Style at Home }


3. I also like the idea of going with a solid fabric, either a shade of navy or green. The navy fabric is most practical in a house full of boys { husband included! } The fabric is an indoor outdoor fabric, so its much more durable than regular fabric, regardless I would Scotch Guard the fabric! I love look of Tori Spellings living room: neutral sofas, yellow lamps, dark wood floors { like our living room, but ours is obviously much smaller } One of the standouts in her living room, for me is her elegant large bold color choice of an ottoman! I love that its green and feels classic yet modern, perfect combination.


 4. Depending on what color fabric we go with if we decide to DIY an Ottoman, I'll be changing out my existing beloved yellow tray, I found at a thrift store and re-did with a new larger tray. You can read more about my tray project makeover here. I love the lacquer trays from West Elm! We already have one in Avery's nursery, its the perfect catch-all for all his misc. baby stuff on his changing table. 


I've also thought we could go the other DIY route and build an ottoman using: Wood, Foam, Batting and Feet {they sale at Home Depot or Lowes} The ottoman below was a complete DIY Ottoman made from scratch! Which completely inspires me! 


And fo course I LOVE all the amazing coffee tables turned ottoman, I've seen all over blogland! So that's whats been on my mind the past few days. 

Have you ever DIYed an Ottoman? Any plans to make one? What do you think pattern vs. solid?


Photobucket

Ottoman vs. Coffee Table

I've been slowly updating the overall look of our living room. Over the Summer, I replaced our old pillows and made I made new ones. The new pillows, added additional color in our living room: navy, green and golden yellow. I also took down our artwork above our sofa, I want a larger piece of artwork of a large interestingly pretty mirror. I also added more frames to balance our wall ledges in our entryway. Click here to see how I built our wall ledges. Then in the fell we bought a mid century modern secretary desk off Craigslist and completed refinishing it in December. We also added a rug and new pillows from West Elm. Then lastly we added a fun pop of color with a pair of yellow lamps. I have a serious crush on these lamps, so glad I finally found a pair I love.


Now I'm thinking over the replacing our wood and glass coffee table. We bought the coffee table a few months after we moved in our home and while its still loved in our home. It seems to be less practical now that we have a baby. You see Avery is a little explorer and our coffee table has two areas to explore bottom and top, which is fine. Lucky the coffee table is round so there's no hard corners to worry to much about, I just worry about him bumping his head or mouth on the wood surface. 


So for the past couple of weeks, I've been thinking a large-ish square or rectangle ottoman would be a nice addition to our living room.  If we end up going the ottoman route, I still plan on using the ottoman similar to our coffee table, with a tray on top. A tray for me on a coffee table or ottoman is a must, a super quick way to lift items out of the way of little hands. 


Here's a few looks I dig


{ via Pinterest }


{ via Pinterest }


{ via Pinterest }

A reminder of how our living room currently looks


I'm still on the fence about an Ottoman vs. a Coffee Table.


What do you prefer an Ottoman or a Coffee Table? 

Photobucket

Yellow Lamps

A few Mondays ago, I posted about a few pairs of lamps I thought would look good in our living room. I've been looking everywhere for a pair pf lamps for our living room for months, I've tried Home Goods, Thrift Stores pretty much anywhere that sells lamps. I was really drawn to a bright pretty pair of yellow lamps at Target. I couldn't wait to show Hasani the lamps we must buy for our living room, but at the same time I was a little nervous because sometimes it takes a while for Hasani to come around see my vision. So the next day we headed to Target and to my happy suprise he like the exact same lamps. 

Here's how our living room corner looked BCL { before cute lamp }


Same corner now with our new lamp.


We bought a pair of lamps, both sit on the side of our pair of chairs. The lamps were budget friendly too. Each were around $ 44 bucks each plus the lampshade which was $ 14.99. So we spent around $ 60 bucks per lamp, which is a steal compared to similar lamp styles at Crate & Barrel and Lamps Plus that start at 100+ each. I'll post more pictures or our living room which has been slowly evolving since we bought our house 3 yrs ago. Click Here to see how our living room looked we when first moved in, its come a long way.

Any fun bright new updates to your living room recently? Have you spotted any swoon worthy lamps latley?

** Kirklands Giveaway Winner: Congrats to Lauren from the blog Myers Mason, who won the set of Decrative Keys in our recent Giveaway!! Lauren, I'll be contacting you soon, so your price can be shipped out to you **

Photobucket

Adventures in Homemade Baby Food

I've been making baby food for Avery for over three months and so far its been a fun adventure. I'd decided to share my experiences so far. I started thinking of making my own baby food for Avery when I was about six months pregnant. I really wanted to make healthy fresh baby food for our baby. I also liked the cost savings verses, buying jar baby food, but that wasn't the deciding factor. The deciding factor was starting healthy eating habits ( fruits and veggies ) from a very early age. I want Avery to love all types of fruit from mango's to watermelon. Most importantly to love veggies: peas, carrots, beets, cauliflower, spinach etc. After talking with our baby's predication, we starting introducing 'solids' at four months old. From four months to six months we fed our little guy mini meals of rice cereal and eventually oatmeal. We didn't introduce fruits and veggies until he was six months old, which is around the age most babies are ready to start on solids aka pureed food. 


Recent veggie and fruit purchases for large batches of baby food: strawberries*, potatoes, sweet potatoes, bananas, apples, beets, carrots and parsnips.


*I recently started feeding Avery a small amount of cooked pureed strawberries that I add to his applesauce. We've had no allergic reactions


What I use:


While I was still pregnant I bought a Baby Bullet after seeing their infomercials on one of my many sleepless pregnancy nights. At the time they had a buy one get one free special going on, so my friend Summer (also a fellow blogger) and I bought one together and got one free! Gotta love those late night specials. There are a so many options if you want to make your own baby food, you can use a blender, food grinder, food processor or baby food maker (like I bought) For me I like the idea of using a device that was exclusively used for Avery's baby food and nothing else. Most baby food makers range from $ 19 to $ 114.00 it all depends on what works best for your family and needs. You can buy baby food makers at Target, Wal-Mart or online like Amazon. I've seen baby food makers that both steam and puree all in one device. I like the baby bullet for a few reasons: clean-up, easy to use, large batches of food, cost, storage (the bullet came with fridge and freezer trays) I've always read & heard good things about these brands: Beaba Babycook, Baby Brezza


Baby food making musts:

  • spatula
  • baby food blender or grinder (as mentioned above)
  • small paring knife
  • chopping board (used only for baby food)
  • metal steamer basket 
  • casserole dish or cookie sheet (for roasting)
  • silicone freezer trays or baby food freezer trays 
  • Freezer storage bags 
  • peeler 

Shopping:


I go grocery once a week for our household and for Avery's baby food. I buy a combination of fresh and frozen veggies for Avery. I always buy fresh fruits for his baby food, you can buy frozen fruits, which is perfect when they are out of season. Typically I buy peas, green beans, cauliflower and broccoli frozen. Carrots I go back and forth between frozen, if I'm making a soup for my family that week I'll buy fresh. No soups planned, I'll buy frozen carrots. I also like buying steams in the bag frozen veggies (if on sale)  I always buy plain frozen veggies. When actually I get around early enough on Saturday mornings, we head to our local Farmers Market for fresh produce, they typically have a good affordable selection.  


Frozen peas, in my metal steamer basket


Making & Storing:


Making baby food is pretty simple and fun! I always steam or roast my veggies and fruits until tender before pureeing them. I steam Avery's veggies and fruits using a metal steamer basket, I bought one at Wal-Mart for $ 4.99. I find it faster to roast certain vegetables like: sweet potatoes, potatoes and squash then it is to steam. I love the smell of fresh baby food, it smells amazing! The color and taste (yes I've tasted) is hands down, so much tastier than buying store bought baby food.

Here's an example of how to make sweet potatoes. Tip: Buy smaller sweet potatoes because they roast faster and are easier to peel. Heat your oven to 345 degrees, clean the sweet potato and. Place the sweet potato on the cookie sheet, I line my cookie sheets with parchment paper for. When I'm able to cut the sweet potato very easy with a parring knife I know sweet potato is cooked though and its time to puree. After the Sweet Potatoes are roasted, I peel the skin of off and then cut the veggie into small chucks and place in my baby bullet 'large batch' blender. I also add about 3/4 of a cup of water, then I mix until smooth and creamy. Using my spatula, I make sure there's no chucks left, if they're chunks I keep blending until smooth. As Avery gets older, I will start making chunkier baby food. 


Pureed sweet potatoes in the large batch blender


Baby food can be kept in an air tight container for three days in the fridge, so when I'm making food I leave some in the fridge and freeze the rest. 


Wal-Mart, great price and works great. The brand is NUK with Annabel Karmel 'Fresh Foods' click here for the website. I also like the bowl and food masher I saw while shopping there and might buy it when Avery gets older, perfect for older babies and on the go eating. For some reason Wal-Mart doesn't show her products on their website, so it appears they sell her products by Nuk in-store only.


Sweet Potatoes in the AK Fresh Foods from Nuk silicone freezer tray


After the baby food servings are frozen, I transfer them into freezer bags. I write the frozen date & veggie /fruit name on each bag and place in a larger freezer storage bag. Baby food can be safely kept a freezer for 3 months. I use the oldest date baby food first, you can safely thaw food in the fridge or in the microwave using a microwave bowl, I'd would cool in the fridge to avoid 'hot spots' caused by the microwave.  


Frozen green beans, originally frozen in the Baby Bullet silicone freezer trays.


Frozen Carrots


Time Management:


I don't feel making homemade baby food is too time consuming. I can easily steam some peas in the morning, and then puree them, store and freeze in about 30mins while I get ready in the morning. I work full-time 40 hours a week, so for me its easy to plan on making large batches of baby food once a week. Kind of like I'm cooking a larger Sunday dinner, instead I'm steaming, roasting and pureeing food for our little guy. I also prefer making large batches once a week, because I can make so much food at one time. For instance two medium size bananas (plus water adding for blending) makes six portions of baby food. I get help while I'm making baby food, Hasani will watch Avery or I'll put Avery in his highchair and talk to him and tell him what I'm making for him. I do buy some food in baby jars, a few fruits that are out of season. Here's a quick list of baby food Avery's had so far, I've been feeding him way more veggies than fruit so far. We introduce new foods every three days, to make sure he has no allergic reactions. 

  • Fruits: apples, pears, bananas, peaches, prunes, cherries, avocado 
  • Vegetables: peas, carrots, sweet potatoes, green beans,  potatoes, squash, butternut squash, spinach, beets, kale, broccoli, cauliflower and parsnips 

I recently introduced Avery to potato and beets swirl, at first he wasn't sure if he liked the beets but after a few spoonfuls he loved it! I find that if he doesn't like something at first after a few more bites, he ends up liking it. He's still not a fan of green beans, so I always feed those with apples, which he loves. 


Potato and Beets swirl, recipe from the book The Baby and Toddler Cookbook


A typical snack and lunch for Avery.


Snack: 

  • mum mums or yogurt melts
  • peach yogurt mixed with rice cereal (more on yogurt below) 
Lunch:

  • Peas mixed with barley
  • Pears 

Resources:


I like the website Wholesome Baby Food its was full of useful tips. But I really wanted a resource book and cookbook to make exciting combinations ( beyond banana and apples) of baby food  from now until he's a toddler that would continue promoting eating healthy. Plus I want to confirm what fruits and veggies are age appropriate.  Amazon has a huge section of homemade baby food books, click here for the book list. I recently purchased The Baby & Toddler Cookbook, I'm really happy I did. I've had the book for a few days and have already tried one of the recipes the beets & potatoes puree, that I already mentioned. I've already book marked a few recipes to try with Avery: beet, squash and quinoa swirl and summer fruit smoothie. The smoothie looks so good, its made up of bananas, nectarine, blue berries and apple juice. When he's 12mos plus I'm looking forward to making these recipes: mini salmon cakes and mini apple pancakes.


In addition to making Avery's baby food we're also starting to teach him to feed himself snacks. We recently introduced Mum Mums which he loves and yogurt melts. I also feed Avery baby yogurt. Its so cool, that babies can have yogurt! Its really good for their digestion. I buy the Gerber brand yogurt so far he's had peach, blueberries and strawberries. I plan to start making his own yogurt combinations. Thanks to the book, I bought know what type of ready made yogurt buy and will puree fruits to mix in. Yogurt can safely stay in the fridge for one day, and frozen portions are safe up to three months (in the freezer)

He also eats bananas and streamed apples in the Nuby Nibbler. He can eat super messy super fast when feeding himself. It's so cute. I love using them, but they are a pain in the but to clean. 


I'm only a few months into our homemade baby food journey and already I'm having so much fun.  For my family making homemade baby food really works out well. Sometimes I feel like Diane Keaton in Baby Boom, when I'm making large batches of baby food. I'm sure watching the movie 1,000 times over the years made it easier to decide to make baby food this time around. With our older son I used jar baby food ( there was so little information about making baby food back them ) I kid with him, I'm going to start feeding him pureed food :) lol. That's my journey so far on making homemade baby food. 


Did / Do you make your own baby food, what are your thoughts on the subject? Are you planning or thinking about making homemade baby food when you have children? I'd love to hear your thoughts, please feel free to ask me any questions! 


Photobucket

Valentine

From my Valentine, he's always the best at finding the perfect cards for me! Love you Hasani :)


Happy Valentines Day Everyone!

Photobucket

Family Dining

We recently added a new piece of 'furniture' to our dining room, which now allows for family to all dine together. I'm in love with our newly bought highchair! Remember when I was thinking about looking for a vintage highchair on Craigslist? Well after looking for a few weeks, we decided to buy the Ikea Blames highchair. Before we got the highchair, we would put Avery in his Bumbo, on-top of our dining room table { carefully supervised at all times } and feed him there Due to having the Bumbo on the table we hardly ate together as a family, we dined in shifts. First Hasani and Tabari would eat, then I'd feed Avery and then I would finally eat. Our little guy, in his Bumbo. 


We bought the the highchair a few weeks ago, and it was super easy to put together. I put it together while Hasani was doing a Starbucks run for me! I must have a vanilla latte at least once a week, lol. You may remember when we were originally considering spraying painting the highchair grey, but after building it we soon realized it looked so good as is. The dark highchair, works perfectly with the dark legs of our dining room chairs and our walnut stained dining room table.  

I love how the highchair has a small footprint in our already small dining room.
It doesn't overwhelm  our space at all. I also like the tray it wipes clean super easy and its not big and bulky.The smooth finish on the highchair also wipes clean. We also bought the little cushion insert for the chair, it was super affordable only $ 5 bucks. I'm planning on recovering the cushion with fabric from my stash so it blends better in our dining room. When the highchair is not bring used we place it in the corner of our dining room, I'm glad t takes up such little space.


As Avery gets older and we no longer need to use the tray, the high chair pulls up nicely to the table, not perfect but nicely.


Avery also loves his highchair and knows when I put him in it, its time to eat.  


Our little guy is growing so fast. 

Have you bought anything recently that makes you smile?

PS Don't forget to enter the Kirkland's Decorative Keys Giveaway

Photobucket

Giveaway: Kirkland's Decorative Keys

** This Giveaway is Now Closed ** The winner is Lauren via Myers Mason Blog ** Thanks to Everyone for Entering **


Do you love the look of vintage style keys? But they are super hard to find, right? I've been on the lookout for quite sometime. Well, Kirkland's has teamed up with CLH to Giveaway a Decorative Key Set to one lucky reader!


Decorative Keys 


Kirkland's also sent me a set to review and I'm happy to say I love them. They are super heavy in weight and have they aged antique look. You can hang them on the wall or just place them on a table etc. { since they are flat one side } 


I've read about Kirkland's on other peoples blogs, but was disappointed they didn't have a store near me. Well I'm excited to announce, Kirkland's just opened a store in the Greater Sacramento Area, Folsom to be exact! There're also opening a store in Vacaville, for all you locals. Click here to find a store near you, you can also shop them online. This weekend I'll be shopping at Kirkland's to check out their lamps! They have amazing lamp collection online. As you know i'm looking for a pair of lamps for my living room, can't wait to see what they have. 


Giveaway Details


Prize: Decorative Keys Set 


How to Enter: Post a comment my blog, and share where the decorative keys will hangout in your home. Please click here for additional fine print

Giveaway Starts:  Thursday 2/9/12
Giveaway Ends:   Thursday 2/16/12 (at midnight PST)


Number of Winners: One
Prize Ships in US (Open to only US Residents)


Good Luck to everyone that enters the Giveaway!! PS Do you have a Kirkland's store near you? If so do you like it? 


** Please include your email address in your comment, so I can contact you faster if your the winner!! **


Photobucket

Be Mine: Sweets Done


Last Wednesday I shared the Valentines Day projects I planned on making. today I'm sharing the my Sweets Project. I decided to make to sweet deserts. First up a spin on Cake Pops the easy way a mix of store bought and homemade. Here's how I 'made' my cake pops. I bought Entenmann's donut holes and lollipop sticks from the store. You can buy donut holes at in any grocery store or better yet buy them from a mom and pop donut store. I didn't want to make two stops that morning, so just bought those.  


I made homemade vanilla glaze using this recipe, the glaze is super sweet and yummy. I rolled each cake ball into the glaze, then sprinkled the sprinkles on top and then added the lollipop stick. I placed the cake pops in the fridge for about an hour to allow the glaze to firm up. 


The result very yummy and super sweet cake pops, they are so sweet so having one is perfect! I enjoyed my cake pop with a cup of coffee, mmm mmm


Next I made for the very first time I made homemade sugar cookies cut into shapes. I bought a bag of cookie cutters from Target and ended up only using the large heart. I made a few cookies with the x and o's but they were so tiny, we made the rest all heats. I used Martha Stewart's sugar cookie recipe and my cookies came out so nice! 


As a first time cookie baker using cookie cutters, I never knew how involved the whole process is!! Make the dough, chill the dough, let the dough stand, roll the dough cut, re-roll the dough. Let the cut cookies chill in the freeze, line the cookie sheets with parchment paper and on and on! Most of my Sunday was consumed with following all the steps Martha gave. As a result my cookies tasted so good and held their shape, some edges weren't perfect but that's OK. 


Next I made my own white royal icing, which is super simple to make and again crazy sweet all sugar, a little water and egg whites, click here for the recipe. I bought some gel frosting for the outline and to decorate the inside, here's where I went WRONG. I didn't know at the time, gel frosting doesn't harden. It stays 'wet' which sucks when your filling the inside of your cookies with royal icing that does harden (but stays yummy) So when I went to fill the inside it got tricky and things ran and I ran out of the gel frosting. I just had enough to outline all the cookies, so wasn't able to decorate the inside of the cookies. Here are my cookies, sorry for the bad lighting it was late and they were so tasty { all gone } I was unable to take better pics. 

Next time I make sugar cookies, I plan to using Royal icing again and have food coloring on had to make pretty colorful outlines and decorate the inside. The cookies are lot of work! I learned some much making this batch of cookies, and I hope I keep improving. I'm anxious do decorate some more, its all trial and error for sure! 

Have you made the any treats for valentines day? Or are you a cookie pro, would love to know your icing tips and secrets :) 

PS. Dont forget to hop over to Summer's Blog and see what treats she made
Photobucket