-->

My Sons Room Re-Do Ideas

In January one my of my Project List goals was to create a mood board from my son’s bedroom re-do, January proved to be a busy month and I never had a chance to create one. Now that its' almost February I thought I better get started on his room plans! Even though his room re-do is a few months off, I like to plan ahead. Over the past month I've scored some great finds for his room, see I have been working on it.

My son is 9 years old - So I have to create a perfect balance between adolescence and impending tween years this year he's turning 10! Whoa he'll be in double digits soon. When we bought our house last year I made the huge mistake of painting his room and awful blue shade - I thought I was getting a more mature blue - Um NO, it was a scary baby blue on all 4 walls! Defeated, I left his room untouched for a over a year. Now I've come up with a new color palette that I think he'll enjoy for a while, most importantly he approves.

The Room Plan


My Objective:
  •  Color Palette: Gray Walls, Navy Blue dresser & Accents, Cranbery Red, Bedframe & desk and Accents, Limey Pear Accents (I really like this color with the grays, reds and blue, it adds more interest to the room). I will update this with the name colors soon.
  •  Lighting: I really like the woven pendant light from Ikea, I like that it will provide a layer of of texture my sons room and its COOL. However if it proves to be way to large, I will go a DIY route use a large bamboo drum shade instead.
  • Organizing: I like this Cork board from Pottery Barn, however at $ 179.99 it’s not in the Budget. I will DIY a large corkboard for his room to hang over his desk. I will also use soft bins for storage for his legos, toys etc.
  •  Area Rug: Instead of using one large area rug to cover the floors, I plan on using these round area circles from Ikea in blue, red and limey pear. For only $ 9.99 this is a great affordable option.
  • Clothes Storage: While I love this option from Land of Nod (Crate & Barrel Kids); I plan on browsing Craigslist hoping to score a great deal on smaller dresser, like I did for my bedroom. The dresser will play double duty and also be used to hold his TV.
  • Study Time: A few months ago we found a great desk for $10 bucks on Craigslist, in need of a little love and paint. I plan on painting his desk red and updating the hardware. I will also be on the lookout for the perfect work lamp so he has plenty of light to do his homework.
  • His Bed & Bedding: I plan on using is current bed frame, I bought the bed frame from Salvation Army a few years ago and nicely updated it with Red paint, lucky for me it works with his Color Palette. In December I found the perfect bedding at JC Penny's for a steal! His current nightstand while ok - will be updated with a new - again hoping Craigslist Comes though for me.
  • Artwork: My son's a little artist; I plan on framing his favorite drawings and paintings with white Ikea Frames. I love the large selection of frames in various sizes and they have AND at great prices. I will also buy a few Hero (Superman & Batman) pictures and frame them as well, of course he'll have final approval on all pictures!  
I'm so looking forward to re-doing his room, and he is too. He told me the other night, "Mom, I don't like my bedroom wall color." Of course I'll post his room before picturses very soon, just need to him to pick up his legos off the floor!

How To: Make Your Baseboards TallER

When we moved into our home in January 2009 - all of all baseboards were a honey oak color. We quickly got to work and painted our baseboards a bright glossy white. The bright glossy white baseboards really helped our wall colors look like there more true color. When we started to tear up the tile in our dining room and kitchen, my husband carefully removed our baseboards. Of course during the removal got dinged and I knew after we reinstalled them I would have to repaint them, which got me thinking. Even though we had nice baseboards, they are the standard 3" they looked kind of blah. One thing I love about older homes is the character and I wanted to add more character to our excising baseboards. I decided the first room to tackle would be our dining room - perfect timing since we installed new dark faux wood floors.


Here's what we did. I made a couple of trips to Home Depot and Lowes looking for the perfect piece of molding to give extra oomph to our baseboards. I came across a piece of molding at Lowes birch wood already primed that looked to be the exact depth of our current baseboards. I bought one piece and put it up against our molding and it looked perfect! I made a trip back to Lowes and picked up three more pieces of molding for our dining room.


Tools Needed

Miter Saw or Miter Saw Box
Caulk
New Moldings
Nail Set
Nails - We used panel nails (you can also use liquid nails)


Step One:

Line up your new molding with your old molding, mark for your mitered cuts (corners). We used a miter saw (we got one for easy cuts for our flooring we installed). We picked up from Sears at a great price $99.00 on sale, and it even comes with a laser track to make all our cuts smooth. We also changed our blade to a finish blade so all the wood pieces we cut will be nice and smooth, this is important!

Step Two:

After all the miter cuts were made, I placed my new molding on top of the excising one and began to nail the molding into the wall. I spaced my nails about 16 inches apart. Next I used a nail set and - and sank each nail into the molding, so it’s no longer sticking out

See that top piece, thats off white? Yup that's the new molding laying on top the old molding


Me, hammering in the new new moudling


Step Three:


I caulked like crazy. I caulked the seams where the two pieces of baseboard met, and then I topped the caulk. Next I caulked all the nail holes and smoothed out the caulk using my fingers. I caulked the heck out of our mitered corners. Let that caulk dry! We have the slow drying caulk - so I had to wait two whole hours - which felt like a lifetime, so I watched a cheesy Lifetime movie.

Step Four:

After all the caulking was done, I light sanded the new and old baseboards, and wiped away any dust - the old baseboards were pretty roughed up after they were removed them, so a light sanded would make my coats of paint nice and smooth. Next I taped off the baseboards top and bottom (yes I used the cheapo painters tape, but it works!) Next up priming the baseboards - Even the top 'new' baseboards were primed and went ahead and primed them again. I waited an hour for the primer to dry and then painted the baseboards a bright glossy white.

See, they needed a light sanding and primer


Two coats of paint later much better


** Please note I also added quarter round molding to the bottom of the baseboards, since we installed faux wood floors you leave a small gap between the wall and the floor for expansion and contraction. It proved too tricky for me to use nails on the quarter round molding. So  instead I used wood glue and applied it on the baseboards, let it to dry and then caulked the heck out of it - looks perfect! **

Step Five:


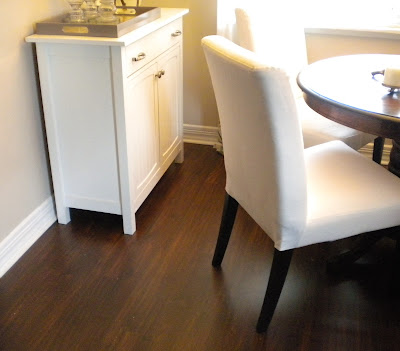
Take a step back admire your work! You did an awesome job. I love how the white baseboards really contrast lovely with the flools and our wall color.


I did the entire project myself except for the mitered cover cuts – next time I’ll do those solo.  This is an easy DIY project. Next up - I'm going to make all our baseboards tallER! And of course now that we are the proud owners of a miter saw, we will be DIY Crown Molding!

Project Cost:

Top molding $ 17.46 (@ $4.44 dollars each)
Quarter Round molding $ 17.46 (@ $4.44 dollars each)
Box of Panel Nails $ 1.79
Nail Set $ 1.99
DAP Caulk - Had on Hand
Zinsser Primer - Had on Hand
Valspar Glossy White Paint - Had on Hand
Total: $ 39.30


Tall molding that add character - Priceless


Have you added height to your existing baseboards? Will this be added to your To Do list?

Let the Light Shine On

When I first started planning our dining room re-do I knew I really really wanted an amazing drum shade pendant light with a diffuser that I often see in restaurants where I live. I love that drum shades give off such a cool vibe and add a wonderful focal point to a room. Originally when I started looking for lighting I came across many drum shades that were way out of our budget. I also came across this one from Overstock.com for $ 89.99 but it didn't wow me. Then when I created my mood board one my objectives, was to find a drum light fixture for our dining room at a good price. Then lovely Micah over at The Yellow Front Door suggested I look into the Pendant Drum Shade from CB2, it’s the same shade she has in her dining room.


Eden Pendant

I instantly fell in LOVE with the Eden Pendant Lamp! It’s amazing, very pretty, nice linen fabric, oh and it’s very large. I knew it would be the perfect complement to our dining room. There was only one small dilemma for us; it was a plug in cord. Since are dining room already had hardwired lighting, Mr. CLH and I decided to hard wire the Eden Pendant Lamp. We made a trip to Lowes and decided to use a Brush Nickel Mini Pendant kit. While there we also picked up a small ceiling medallion to help cover our icky whole in the ceiling and add a layered elegant look to the light fixture. My husband installed the new light fixture himself and I don't have any pictures he did it while I was at work!


The kit comes with three downrods, with used two downrods. Basically he installed the Pendant Kit then attached the drum shade onto the light fixture and voila! We have light. I think the Eden Pendant light really brings the whole dining room together and adds so much ambiance to our new dining room! For more pictures of our dining room makeover click here.


Budget Breakdown

Eden Pendant Lamp $ 49.95
Ceiling Madallion $ 6.99
Brsuh Nickel Mini Pendant Kit $ 17.99 (online it's more?)

Total: $ 74.93 - Still cheaper than the Overstock Price and for a extra bucks we were able to customize the look for our dining room. Can't beat that. Have you fallen hard for drum shades, like I have? Or have you customized a light fixture to better suit your needs?


My Dining Room: Before & After

Back in November my dining room that is an eat in kitchen style and the size of a small breakfast nook lacked serious style. So I created out a plan to tackle the room and create a space that my family would be able to enjoy on Saturday mornings but be pretty enough for entertaining friends on Saturday night. Last weekend we finally finished laying our new faux wood floors in our dining room and kitchen and I began putting our dining room back together. I'm so thrilled to having my living room back; we literally parked our entire dining room in the living room during the 'demo period.'


Let's take a trip down memory lane, here's my dining room before.


When Mr. CLH removed the outdated light fixture with found this 'present'


Tearing up the awfull craked and stained tile flooring


Removing the thinset from the lino - yup this was underneath the tile!


Now I love my dining room, its so pretty to me now. I so can't wait to get started on redoing our 1980's kitchen. I hope you like the dining room after as much as my family does! As I said before my dining room is very small so it makes taking pictures interesting.

This is how our dining room looks when you enter the room from our living room


This is the view from the kitchen


The blue mirror and buffet make the perfect pair - love those fresh flowers!


I fell in love with this fabric a few months ago, and decied to add it to the bottom of my Ikea curtains. The fabric colors tie-in perfectly to the rest of the diningroom and will compliment the kitchen when its done too.


Here's a better view of our new floors, a big improvemnt over our tiles! In addittion to laying our new floors, we also added moudling to our baseboards making them much taller and prettier.


I'm a happy camper! I can't wait to hear your thoughts.

Mirror Mirror On My Wall: Take Two

I found this great oval mirror for my dining room on clearance at Ross for $10.00 and painted it white, hung it in the dining room and liked how it looked. Then when we cleared out our entire dining room preparing to rip up the entire tile in the dining room and kitchen, I began to have second thoughts. My dining room was looking too white, and I love the color white but realized my dining room needed some color. I really wanted to paint the mirror, but what color would I paint it?


See how the mirror just blends into the wall?

I was stuck with this thought for a few weeks, until a quick trip into a local Salvation Army provided me with color inspiration. I came across these perfect light tiffany blue dishes - perfect for serving dip or small casseroles in. I paid my $1.98 and bought the two dishes home and decided to go in the direction of a pretty blue for the mirror. The very next day I received my House Beautiful March 2010 issue, which helepd cement the idea blue is the way to go.


Since this mirror was already painted white, I skipped the primer and opted to lightly sand the mirror frame then paint it with satin paint. The mirror frame has bread work on the inside and outside of the frame so I used a small craft brush (the same brush I sued on my bench makeover) and a small petite roller. I love this roller, I found these tiny rollers at Sherwin Williams and they are prefect for small spaces. Next I used two coats of clear poly to ensure my mirror frame would be nice and glossy.The reslut is a pretty blue mirror I can't wait to hang in the dining room!


I love this shade of blue, its so grown up and changes color thoughout the day, here's a tiny glimpse of the mirror. I will share the entire dining room soon. Just need to add a few finishing touches. Have you painted something, only to realize later it didn't have enough oomph?


Weekend Warriors: Tearing Up Tile { Part Two }

A few weekends back we torn up our fugly cracked icky tile {yes it takes that many words to describe, its awfulness} in our dining room and kitchen. As I mentioned before we discovered the previous owners placed the tile over the linoleum, hence all our cracked tile. Since we decided to lay floating floors in the dining room and kitchen, we had 2 options. #1 Remove all the remaining thinset (cement like mixture on the linoleum) #2 Remove the linoleum and replace all old flooring boards with new subfloors and then install our new flooring. Before we started the next step we consulted my dad, who's a contractor. He said this easiest step for our situation, since we just want to float of new floors is, remove all the thinset from the linoleum.

When we started the Part Two - We had no idea how hard this step would be! Image ripping up tile then realizing you now have to painstakingly remove what looks like hardened oatmeal cement from your floors.

Weekend One

The first weekend of removing the thinset we were optimistic, we had our chisels and floor scrapper on hand, but it ended up taking an hour or longer to remove a 12x12 section of flooring. It also didn't help, that I became easily frustrated and would disappear from our 'job site' for a1/2 hour, leaving Mr. CLH all by himself. Needless to say he would become agitated by me. Next we bought a flathead shovel to help remove the thinset, it helped a little.


All the thinset residue, has to be removed before laying new floors
Weekend Two

The following weekend we must have gone to Home Depot 5x times trying to find a tool that would remove the thinset without damaging the linoleum. One Home Depot Associate tired to sell us Acid to remove the thinset. Yes Acid! Could you imagine bringing a bottle of Acid home, when you have a 9 year old and a small dog? Not a good idea. By the end of weekend two, we were stressed out and feeling spent. I begun to ask myself, Should we just have left that ugly flooring? I mean was it that bad?

On Saturdays we had many fun conversations about removing the annoying thinset (H: husband
W: Wife)

H: let’s just go buy the Acid

W: we are not buying Acid, eat will eat though the linoleum and it’s not safe! We can't even be home when you doing that. It could splash on you!

H: let’s just rip up all the lino then

W: we can't rip up the lino, my dad said that will create even more work. Besides I've done some research, since our home is older the lino was likely applied directly to the subfloor which is most likely plywood. Which means the lino and subfloor would come up in chunks, creating more work

H: Lets just buy the Acid

W: NO!

Of course these conversations are followed the by silent frustration in the air. We hated coming home to our dining room and kitchen items parked in our living room. Even wrose we thought this project would take at most two weekends. Reality bites, talk about DIY novice. So Sunday night 2/7 after calling my dad and crying asking for more removal advice, we decided to stop in Lowes and look for a better chisel, no luck. Then I had an 'we have nothing to lose idea' is there some sort of cleaning product we could use to soften the thinset and turn into mush without buying toxic ACID??

We started browsing the cleaning aisle when my wonderful husband found CitraStrip Adhesive Remover. Our mouths dropped open, we had been 'Goggling removing thinset set from lino / wood subfloors for days' and talking to various Home Depot associates with no luck. Would this even work? Is this a pipe dream? We loved that the product is Low V.O.C and is safe to use indoors and still strong enough to remove the mastic aka thinset from the floors. For $11 bucks for a quart we couldn’t wait to try the product out.


Mr. CLH, followed all the directions carefully (wore goggles, gloves etc). He simply poured the CitraStrip Adhesive remover on the floor, and this used a long handed paint roller to apply to the floors, each coat must be thick. Next he waited 3 hours to remove the thinset. Guess what? It worked, like a charm. He ended up going back to Lowes and buying a one gallon container to help remove problem spots.

Weekend Three

Fast forward to Friday 2/12, with all the thinset removed from the lino, we mopped the floors good using a good old fashioned bleach. Judge me if you must, but it cleans - lol


My new BBF is the ShopVac, great for picking up thinset crumbs

Late Saturday afternoon we began prepping the floors with underlayment and began installing our lovely floating faux wood floors. We choose faux wood over engineered flooring because, for the color choices and our budget. We have all original 1956 hardwood floors in the rest if the house, so we are more than happy with our faux real floors.

This is how our floors looked a few weeks ago


And a peak of our new floors


I think Mojo appoves!

We still have trim work in the kitchen- baseboards. I'm happy to say our dining room is done; next we need to relocate the dining room from the living room to where it belongs. So I will have a dining room reveal soon.

Have you had any DIY projects that took, longer then expected? I'd love to hear about them.....

My bench was lonely....diy pillow perfect

I few months ago while shopping at Crate Barrell in the 'One of a Kind Section' {its a great section shop there first!} I came across a pretty placemat that's helped serve as color inspriration for my master bedroom re-do. It's the perfect size placement to turn in a simple pillow for my bedroom. It was only $4.95, talk about a steal


(yes I'm sitting on my bed on wrinkled sheets doing this project - lol )


Unfortuanly the placemat has just sat in my room for months as we got busy on other projects around the house. Untill yesterday, when I looked at my recently made over Bench and realized it was looking a little lonely. It took me a few mins to transform the placement into the perfect pillow for my bench.


Isn't this pillow a perfect fit for my bench, my bench is no longer lonely

Supplies needed:
Straight pins
scissors
poly-fiber fill
thread and needle

How To:
1.  Open the seam of the pillow 'at the bottom of your pillow' carefully with scissors, I opened larger then the width of my hand. You can use a seam ripper, but for my it was easier to use small scissors


2. Start stuffing the pillow like crazy, besure and get poly fill into every corner of the placemant so it will stay nice and plump. I like my pillows nice and full, no lumpy pillows for me. So I stuffed a bunch of poly fill into the pillow


3. After you finished stuffed the pillow. I had Mr. CLH hold the pillow nice an taught so I could close the pillow with straight pins, to make it easyier to sew closed. Thread your needle, I always double thread.


4. Start sewing your pillow closed (again MR. CLH held my pillow taught so my stiches would be nice and firm). Once all your stiches are in do a nice simple knot. Your done, pretty simple pillow perfection!

Cost Breakdown:

Placemant $ 4.95 - not including tax
Polyfiber fill - no cost, had on hand
Need & Thread - no cost had on hand


I Got a Happy 101 Award!

The Lovely Angela over at Fixing it Fancy put a huge smile on my face when she gave me a Happy 101 Award. You need to check out Angela's Blog ASAP, she and her husband just completed their master bedroom and closet re-do. Let me tell you the closet reminds me of a boutique and her bedroom is Gorgeous. I'm also a huge fan of her kitchen; Angela and her husband have been remolding their home like crazy over the past few months. Wait until you see all her transformations:


 About the Award: The Award asks for 1. Ten Things I Like 2. Recognize Ten Other Blogs

10 Things I Like

1. I Mr. CLH - we have a blast together! He's simply just amazing and sweet and thoughtful.


2. I like hearing my son laugh when he's watching cartoons or a movie. I also like that he still gives me kisses and hugs every morning before I go to work. He's 9 so this is amazing for a little boy. I normally don't share pictures on my son - but there's a picture of us on Mother's day a few years ago.


3. I like Champagne!
4. I like Jane Austen movies and the books too!
5. I like paint, it transform furniture in amazing ways
6. I like my friends - they are a great group of women who inspire me and find me funny. Whether I'm just hanging out talking with them, going to see a movie or have a girls night in - they really keep the pep in my step
7. I like Chick Movies! 13 Going on 30, My Big Fat Greek Wedding, Sex in the City {the movie}, Pretty Women, Waiting to Exhale, Somethings Gotta Give, Becasue I Said So, and way more.
8. I like shoes, like really like shoes. Did you know my wedding shoes were purple? Yup, I got the last pair of purple shoes in my size at any Nordies stores in the US - bought a few weeks before the big day. Here's a picture of my shoes on my wedding day. LOVE


9. I like my little house; it’s so much prettier now then the day we bought it. Still need to paint that door!

Then


Now


10. I like Netflix! I've been a member since 2005 - love getting my movies from them, so much easyier and they have a HUGE selection of movies over 40,000.

10 Blogs I Enjoy Reading {passing the love along }

1. Get It Girl Style
2. Life in the Fun Lane
3. Freckles Chic
4. Thifty Little Blog
5. Life + Style
6. Cold Turkey Veggie
7. Home to Three Duncan Boys
8. Ish & Chi
9. BluLabel Bungalow
10. Design_Aholic


Martha Tip of the Week

Don't you just love Martha Stewart; I loved her way before it was cool to love her - back in high school! She always has great advice and is so helpful. Her ideas always wow me. Back when I was planning my wedding I couldn’t wait to get my hands on the latest issue of Martha Stewart Weddings, she always had crafty and lofty ideas for brides. I may even have it watched the trashy Martha: Behind Bars staring Cybill Shepherd of course I watched it thanks Lifetime. Well today I came across Martha's Organizing Tip of the Day. She's so clever to think of a tip for each day. Here's my top two for the week.

Martha Tip ONE

Simple felt bag, can be used anywhere from grocery shopping (go green) to carrying books, perfect tote. This will be an upcoming weekend project for me, as soon I have a bit of sanity to my life again. Right now our entire dining room is parked in the living room, thanks to a recent ripping up tile weekend. Click on the How To, the steps in making this felt bag.

Martha Tip TWO


Pretty Patterned Board (magnetic), perfect for an office, kids rooms, the kitchen etc. I could see this in a wide variety of fabrics patterned and solid. How cute would this be, in a solid color and with trimmed with a contrasting ribbon border. Or even using cork instead of the magnetic board. Click on the How To for the simple steps in making is this board. This might be perfect solution for my sons room with the right fabric to help keep him more organized.

{ Photos from www.marthastewartt.com }

Va Va VaBlue

I yelped with excitement when I got my new issue of House Beautiful { March 2010 } in the mail yesterday. I instantly started admiring the lovely all blue living room. Talk about Va Va VaBlue. The entire issue is devoted to the color blue.


I never was a fan of blue until we bought our home, we have a wall in our living room its pretty shade of blue green and blue is also an accent color in my Master Bedroom Re-do. This issue has inspired me kick up the shades for blue in my home....I'm seeing way more blue for my bedroom now.

"Green blue strikes
the right balance
between light and dark,
It's great for warming up
new houses and cozying
up big rooms"
 - SCOTT SANDERS


Here's some amazing blue rooms - LOVE


"Blue as the
ocean, colors that
say sea sky
 and nature"
House Beautiful


"The ultimate
lovely aqua
blue chandelier"
- Chic Little House