-->

Quick Update with Spray Paint

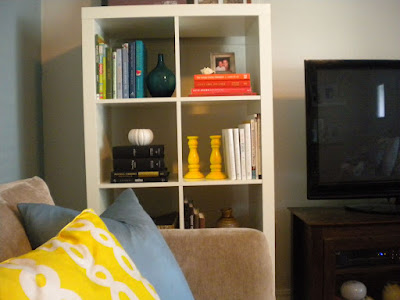
By now I'm sure you all know I love the color yellow, its in pops all over our living room. from pillows I've bought, to pillows I've sewn, to a lemon drop tray I updated with fabric and paint and art. By far out of all the pops of yellow we have in our living room, I adore our yellow candlesticks in our bookshelf. Those candlesticks didn't always pop, they were a cheap find at our local Salvation Army. Again I scored these on a 50% off day, only $ .99 cents for the pair.


I personally don't like to spray paint { when I do, I get cracks, runs all types of issues, no matter what I do } so I had my husband do this project. First he used primer which hides all the flowers etc. and creates a nice smooth base.  After allowing the paint to dry, he painted the candlesticks a bright glossy yellow.


The candlesticks have such a nice smooth glossy finish, I really like how spray paint shines on ceramic items. It took about 3 coats of spray to get a thick coat of yellow.


Did you notice my candlesticks changed shape? Take a second look, yep the original ones above fell to the ground after the 1st coat of yellow paint! So I had to spend another $ .99 cents on the ones above and perform the same update! lol I like the new pair of candlesticks better, then the ones I originally bought. Go figure. Quick budget breakdown, $ 4.98 for the pair - I bought a can of yellow spray paint for $ 3.99 and the candlesticks were only $ .99!!


Are you a huge fan of spray paint for quick updates? Any tips on getting a nice smooth glossy coat? Or are you like me, can't get a nice smooth coat when suing spray paint?
Photobucket

Bring the Outside In

I always love having fresh flowers in our living room and dining from our rose bushes, but sometimes my rose bushes I neglected dead heading for two months! are kind for sad, instead of spending some extra money on flowers for our house, I decided to snip some from the trees and bushes around our house. I did this a few months back when the cherry blossoms were blooming, and they looked stunning.

I grabbed my pruning scissors I snipped a few branches from our big tree in our front yard and some bushes on the side our house. Before bringing the branches inside I washed them in our garage sink to remove any bugs. In the past I've made the mistake of bringing roses in the house before cleaning them outside and seen a bug of two crawl out of the bud. Yucky and freaky, take my advice, rinse them outside and then bring them in!

I cut two long branches for our extra large vase in our dining room. I love the simplicity of the large vase on our dark stained table. It makes a nice statement.


For our living room a few cut branches for a bush for a simple look in the glass vase. I paired the vase with my favorite 'go-to' white vase bought at Crate & Barrel. I simple succulent plant in case square plant holder make a nice trio.


Yesterday it was an extremely hot day well over 105 degrees, yet my house was all nice and shaded thanks to our tree. So getting a good shot without using flash was nearly impossible for me. I mixed in leftover short tree branches from the dining room arrangement with bush branches. The green branches complement our yellow tray, I placed on top of the side table. 


This is my way of enjoying the pretty greenery inside our house while avoiding  the 100+ degree weather we've been experiencing outside for the past few days. How do you bring the outside, into the inside of your home?
Photobucket

Artful Updates { Part Two } Project Done

Last week I shared two pieces of art at Mr CLH & I found on the cheap at our local Salvation Army for only $ 2.50 each! We scored them at a 50% off everything sale. As I mentioned last week we planned on updating each piece of art work with new custom mattes and glossy paint on the already nice frames. I ordered custom mattes from Micheal's, which breathed new life into each print. It's amazing what the right paint and frame color can do to a print!

After we changed out the old mattes, I attached new backing to the frames using heavy construction paper and also attached new hanging hardware.

Here's a reminder of how the 'Bird Print' looked before updating the print.


Here's a close up reminder of how the faux matte cheapen the look of the print.


Here's our 'Bird Print' now. I'm always amazed by the power of paint! The frame is now painted a glossy white and the new matte, helps create more balance. Now instead of your eyes being drawn to the dark frame and then maybe the print, they go directly to the print. This print will hang either on our dining room or bathroom. Mr CLH is still not a huge fan of the print, but he loves the white frame and matte.


Next up, a reminder of how the 'Trees' print looked when we bought it home, I'm still amazed we paid only $ 2.50 for this 22x19 inch print! Remember this print was already custom framed, however it really need updating. The yellow mustard matte really took away the beauty and simpleness of the print.


Here's our print now. I painted the frame a glossy bright white and went with a dark grey matte to enhance the black and white print. I love how this artful update turned out, its a breath of fresh air.


We plan on hanging the 'Trees' print at the end of our hallway. Once both pictures are up, I'll share new pictures of them. I know everyone loves a good cost breakdown, here's how ours added up.

Project Break Down:

Bird Print $ 2.50 
Custom Matte $ 5.20
Construction Paper $ .97 (for back of artwork)
White Glossy Paint & Caulk - n/a had both on hand. I used the caulk to fill in the seams
Picture Hardware: n/a had on hand

Trees Print $ 2.50
Custom Matte: $ 6.00
White Glossy Paint & Caulk - n/a had both on hand
Construction Paper $ .97 (for back of artwork)
Picture Hardware: n/a had on hand

Total cost $ 18.14 not including tax

The biggest cost of our update were the custom mattes from Micheal's, which were a steal!! I brought each frame in with the picture inside and they did all the measuring for the frames. I picked out the matte colors and they mattes were cut within 24hrs. I loved the quick turn around the affordable price! Custom mattes are a great way to enhance artwork of pictures. I'll be starting my sons room soon, so he can have a new room for entering 5th grade and for just becoming a tween. I'm sure I'll be order more custom mattes to display his own artwork in his room.

So what do you think of our updates? Remember next time your in a thrift store look at the artwork you may uncover a pretty piece of art that just needs a little updating.

Photobucket

Giveaway Our Humble A{bowe}d: Winner!

Thank you everyone who entered Our Humble A{bowe}d Giveaway for a chance to win a custom print from Amanda's Esty shop! The winner of the giveaway had two amazing prints to choose from.

'I Love Your This Much' Print


 'Bird Family Welcome' Print


Congrats to entry # 3 Hip House Girl! Who loves the 'I love You This Much' print. Hip House Girl loves the print with pale green lettering on white. Please check your email! Amanda and I will be contacting you about your print!! Make sure you email us, after your print is hung in your house, looking forward to seeing where it lands


Thanks again to everyone for entering, and a huge thanks to Amanda from Our Humble A{bowe}d for teaming up with Chic Little House for a Giveaway! Make sure you stop by her blog and check all the projects that Amanda and Ben have tackled recently { there are a ton!}

PS: Here's my print, customized for our house. Isn't Pretty :)


Photobucket

Ten.

My baby son turned ten today. He is and an official tween now! Love you Tabari :)

Photobucket

Summer Must Haves

I normally talk about about home decor related projects, but thought mix it up and and share my top 6 Summer must haves. Where we live in Northern California the weather can easily reach the triple digits, I'm talking 105  degrees { & up } in the July & August. It's supa dupa hot here. I love finding a good deals on getting projects done around our house for under budget, this also applies to my top Summer Essentials.
Summer must haves.

1. I love wearing maxi dresses in the spring and summer months! I love that you can easily dress them up or down depending on what shoes you are wearing  and what accessorises your rocking. I love wearing  a mix of Jersey cotton maxi dresses. For inexpensive maxi dresses I shop at Old Navy, JC Penny's and Forever 21 { they have a great selection of these dresses } The blue maxi dress above is from Forever 21 and its a steal at $ 15.50!

2. I'm a huge fan of wearing big sunglasses. I prefer buying inexpensive ones so I can own a plenty, there's also the no stress factor. If you accidentally leave your sunglasses behind at a restaurant its a big deal. For affordable and stylish sunglasses I stop in H & M and pick a few pairs here are there, can't beat the $ 5.00 price tag.

3. One of my favorite Summer Scents is Very Sexy Little Things Noir from Victoria's Secret. It's the best selling fragrance, so light and yummy since its a mist. I wore this fragrance on my wedding day, and love wearing it a lot in the Summer.

4. I use the Almond Cookie Shea Souffle from Carol's Daughter daily on my hands and feet daily. It keeps my skin so soft. I plan on buying more of her products, they ones I've tested always smell so yummy. Her products are also available at Sephora. If you look close, you can spot my Caral's Daughter product and my Very Sexy Little Things spray.


5. I'm a Neuatragena girl and have been using their products for years. There are the only product that are gentle on my skien. I use Neutrogena Healthy Skin Face Lotion every morning, I also love that is has SPF 15 - its keeps my skin feeling healthy.

6. My last summer essential are sandals! I love buying tan to brown sandals for the warm months the colors look great with anything. I recently bought a pair of Bandolino sandals { the exact ones above } for $ 19.99 at Marshall's. The Marshall's near me has a great selection of shoes on the cheap!

Here's a picture my son took on my sitting on our front lawn { akward angle, trying not to get licked by Mojo! } I'm wearing two my summer musts: maxi dress & sunglasses.


What's on your Summer must haves?

Ps: There are only two days left to enter the giveway! For a custom print!

 
Photobucket

All Stacked & Organized

Last week I spent time organizing our books by color of their spine for our new Ikea Expedit bookshelf in our living room. I also spent time looking at inspiration photos, to artfully display our books and bring in more style in on shelves. I also got a bunch of tips from the pros at Martha Stewart & Style & Home, that I applied on our Expedit.

Here's our almost Ikea Expedit after it was put together.


We decided to use two large Ikea Kasset storage boxes to hold the frequently watched DVDs, all the barley watched DVDs are in our coat closet. I really the like how well the storage boxes fit in the Expedit and there are such an affordable storage option.


Here's our bookcase now, all stacked & organized. As I mentioned before each book was organized on the shelf by the color of the book spine. I really like the cohesive look the color grouping gives the bookshelf. Even a stack of four orange books looks eye catching.


We moved the Kasset storage boxes the the lower shelves to create more balance to the bottom of the bookcase. To keep all my magazine in one place, I put them in a basket I bought a while back at Cost Plus. I'm so glad it fit perfectly in the Expedit.


Here's a better front view of the bookcase. In place of bookends I used a vase and candle holders. Both the vase and the candle holders tie in perfectly with our living room palette.


Below are two more close up pictures. I took these pictures early this morning on my way out the door - so I will take a few more pics when we have a full sunlight in our living room for cleaer shots.


What to do think our Expedit bookcase? Now the question, I'm asking myself is one bookcase with and art wall or two bookcases? What do you think?

Photobucket

Artful Updates { Part One }

One of the best place to shop for interesting and sometimes original artwork are thrift stores. I'm sure we've all seen our share of craptastic 80's art and fuzzy art posters at thrift stores. However, when you take your time digging though the unwanted and no longer loved art work, you just might find a special piece for your home. Last week I was shopping at my local Salvation Army, hoping to find some thrifty finds. When I saw a bird print that caught my eye, meanwhile Mr. CLH spotted a black and white print that caught his eye. He didn't dig my print, but I loved the print he found! My print was $ 4.99 and the print he liked was $ 4.99 too.  It just so happened we popped into the Salvation Army on a 50% off day for the entire store! We paid only $ 4.99 for both pieces of art work. Bot have nice frames and glass!

When we brought the frames home, I did a quick assessment of the changes we should make to each piece of art work.  First up the bird print. I like the style frame it was in, but knew it would look better a glossy white, that way it would match our existing frames that we have in our house. In addition to painting the frame white, I planned on using caulk to fill in the miter edge, the seam looked wide. I love this bright bird print, but the fake matte and border made the print look so cheap. The only way for the print to standout and look amazing was to buy a new crisp matte.


Up close you can see the miter corners that need help & the tacky fake matter and border that makes the bird print look silly and cheap.


Next up the tree art work my husband found. I'm still shocked he found this & that we only paid
$ 2.50 for it! It's a nice size piece 22inches wide by 19 inches long. We both loved the picture, but thought the mustard yellow matte was taking away from the print and not enhancing it. I also loved the heavy duty well built frame, but knew the color was too dark for our space. Again I knew a white coat of paint would be bring new life to the frame.


Another plus, is the tree art had been previously custom framed, talk about a score we got.


Because both framed are in good condition { minus } there color, I knew the only extra cost to the art update since we hoard white glossy spray paint in the garage would be mattes. Since both pieces of artwork are old size and not stock matte sizes, I knew I would have to order custom mattes. That's just what I did, I stop into Michael's framing department and placed an order for two custom mattes. I've always feared getting custom anything related to framing, because custom framing is expense!

After I came home from Michael's. I began the task of removing the paper backing on each frame along with the old hanging wires. The bird frame, had a really nasty backing on it full of funky stains.


I carefully removed each picture from the frames. Under the paper backing on the tree picture, I found a stamp saying Cresent. More than likely its Cresent City, California. I've been there once its very pretty. The city is right on the ocean and is almost on the California / Oregon border. I'm guessing the picture was taken in Cresent City of maybe even in the Redwoods { which are amazing!}


Next, Mr. CLH will be spraying painting the frames and hopefully our custom mattes will be ready for pickup tonight. I'll have a budget breakdown in part two.

What do you think of the thrifty art we bought? Have you found art artwork from a thrift store that was fab or needed a little artfull update?

PS: Don't forget to enter the CLH Giveaway: For your chance to a Win a print from
 Our Humble A { bowe } d! Click Here to Enter.
Photobucket